Cut-List Kit: plan PDF + spreadsheet
Garage workbench plans that recalculate to your wall
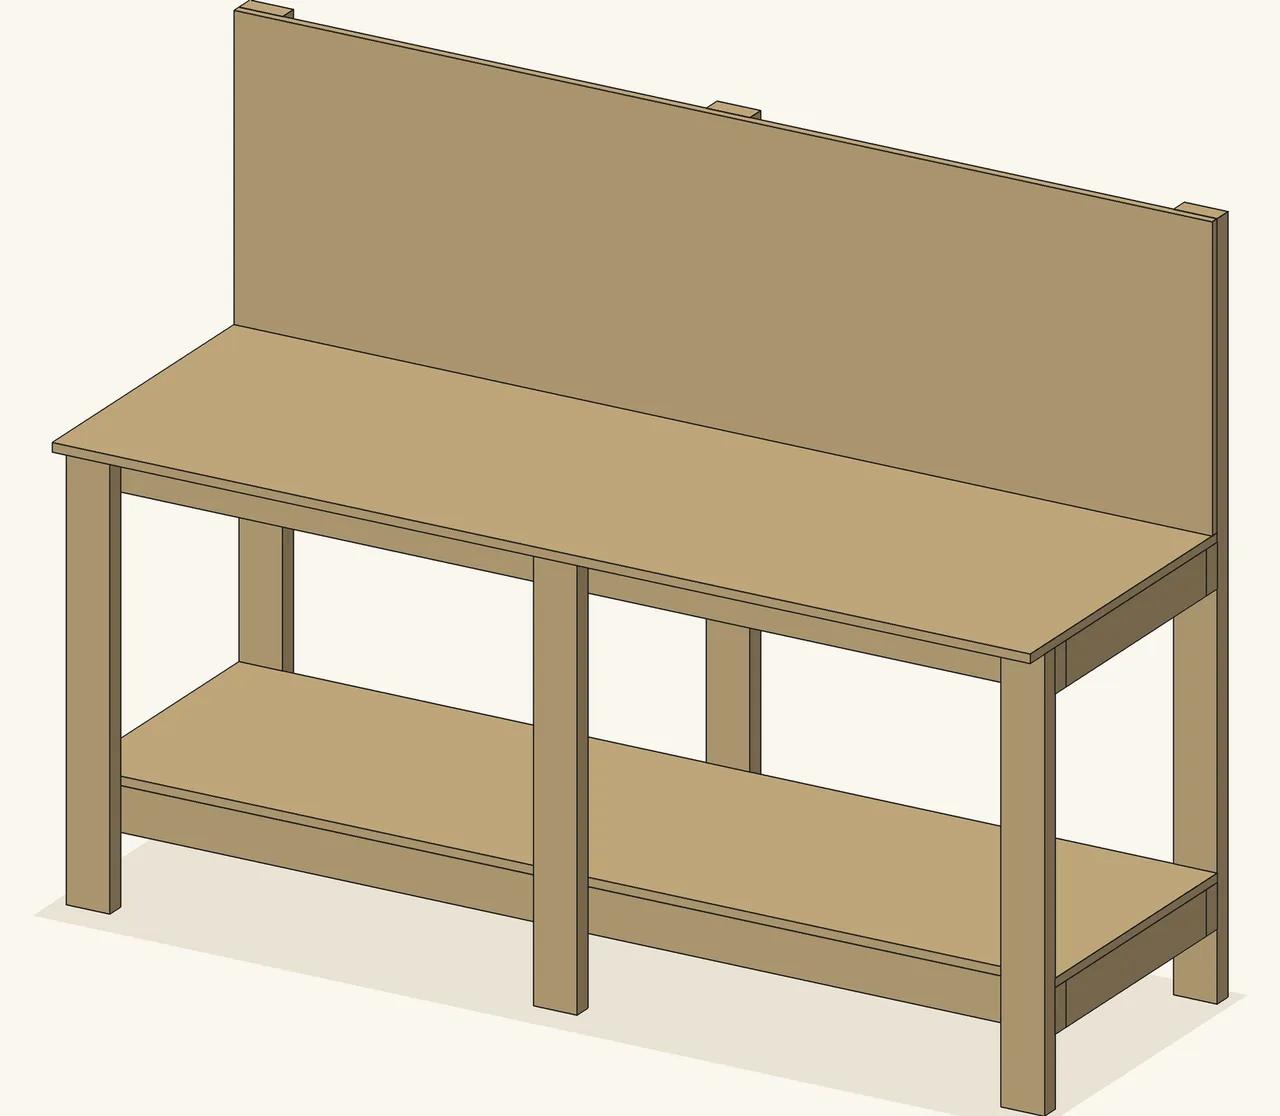
A 2x4 and plywood workbench that stands along a wall, with a full-length shelf and an optional back panel. Type the length of your wall space, the depth and the worktop height. The spreadsheet gives you the cut list, the cutting plan and the boards and sheets to buy.
Digital download: nothing is shipped. Opens our Etsy listing in a new tab. You pay on Etsy and Etsy delivers the files. This site takes no payment.
Price as listed on Etsy on 16 Nov 2026. Etsy may add tax, such as VAT, at checkout. If Etsy shows a different price, the Etsy price applies.
At a glance
- 36 to 96 inBench length (900 to 2440 mm)
- 20 to 35 1/2 inOverall depth (500 to 900 mm)
- 29 1/2 to 41 1/4 inWorktop height (750 to 1050 mm)
- 2 sheets, 10 boardsto buy as the file arrives (mm default): 10 x 2x4 boards, 2 x plywood sheets
- 11build steps in the plan PDF
- 9 + 3pages: plan PDF and cutting diagram PDF
- mm or inone switch in the spreadsheet
- No macrostested in LibreOffice
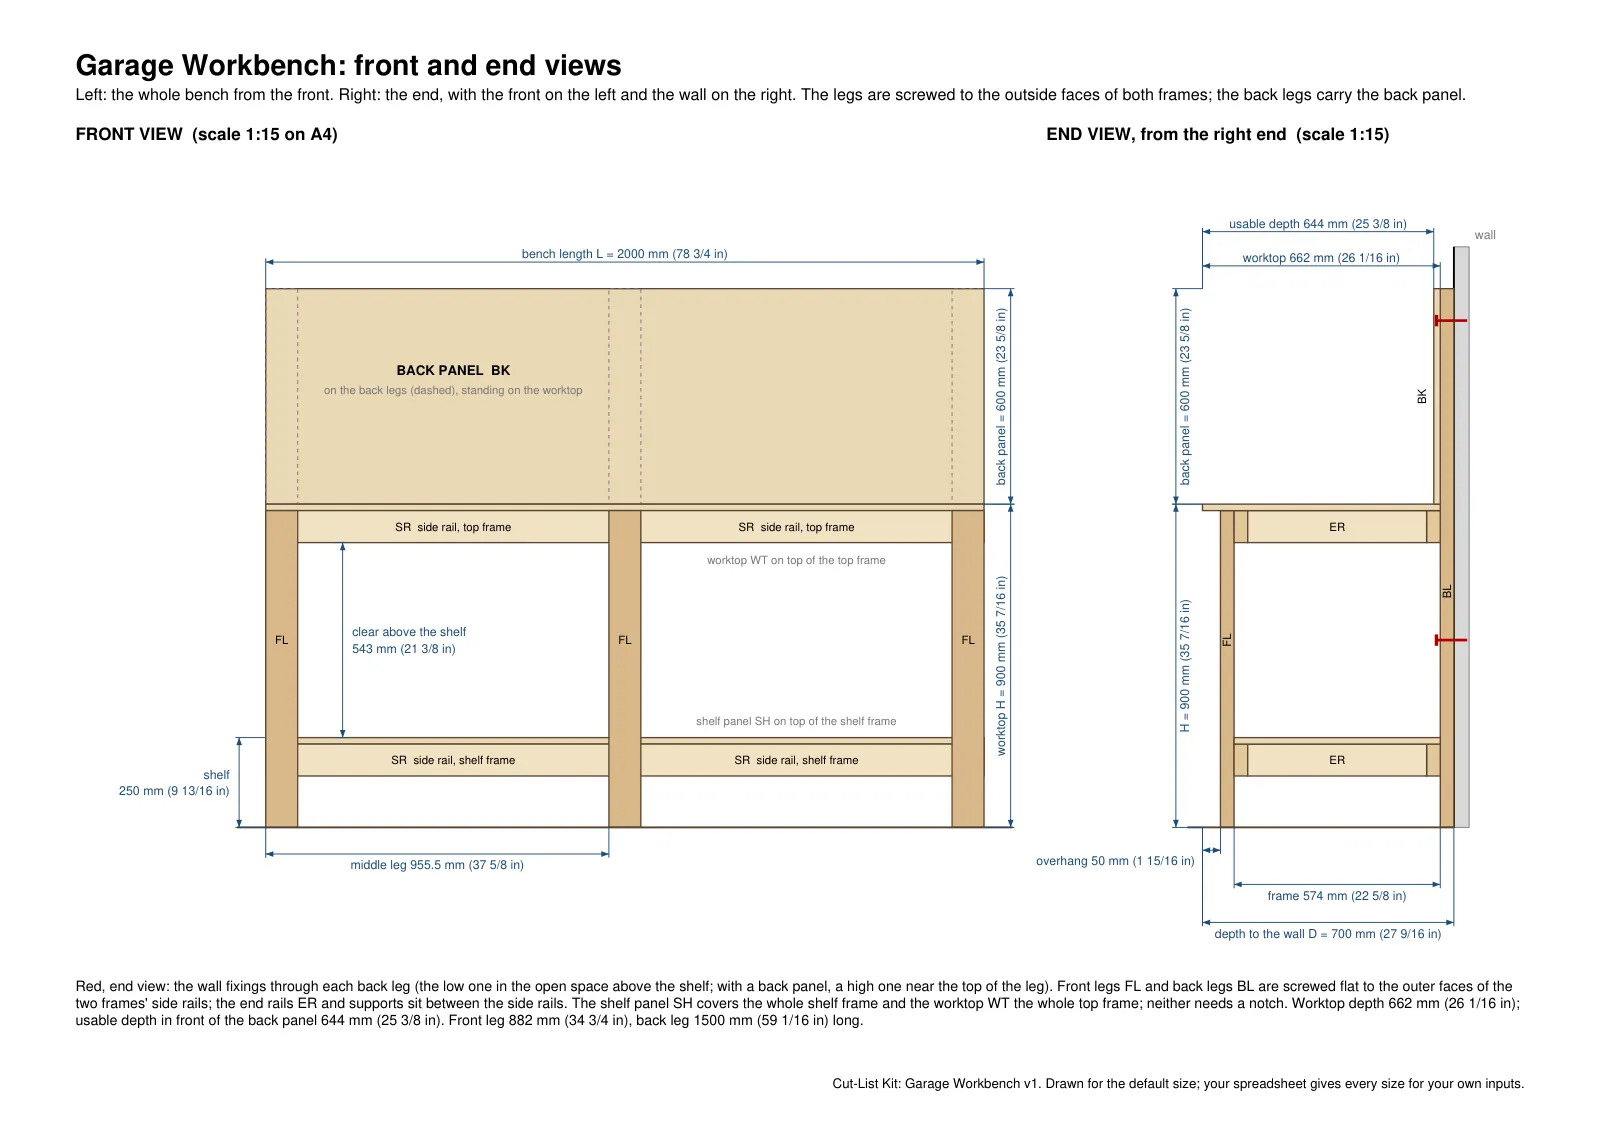
The bench is two 2x4 frames, one above the other, with a plywood panel on each. The top frame carries the worktop. The lower one carries a shelf that runs the full length of the bench, at a height you choose.
The legs are not posts inside the frames. Each leg is a 2x4 laid flat across the outside faces of both frames and screwed to them. That leaves the shelf as one plain rectangle with no notches to cut around legs.
The back panel is a switch. With it on, the back legs run up past the worktop, and a plywood panel stands on the worktop against them. With it off, the back legs stop level with the top frame.
It is for a garage or workshop wall with 36 to 96 in of free length. It is a fixed bench, not a rolling one. It stands on its legs, and the plan has you fix it to the wall before the worktop goes on. The spreadsheet stops the length at 2440 mm (96 in). For a longer wall, the plan says to build two benches side by side.
Sizes you can type
Seven sizes and switches are yours to set. You measure the depth out from the wall, or from the skirting board or curb that the back legs stand against, to the worktop's front edge.
The front overhang is the strip of worktop that sticks out past the front legs. The plan's label gives its purpose: room for clamps.
One of the advanced settings decides when a bench gets a middle pair of legs. It starts at 72 in (1800 mm). The default bench is longer than that, so it is drawn with six legs.
-
Bench length end to end along the wall (up to 2440 mm / 8 ft; longer wall: two benches side by side)
36 in900 mm96 in2440 mm
Starts at 2000 mm, or 78 in when the sheet is set to inches.
-
Overall depth wall (or the skirting or curb the back legs touch) to the front edge of the worktop
20 in500 mm35 1/2 in900 mm
Starts at 700 mm, or 27 1/2 in when the sheet is set to inches.
-
Worktop height floor to the worktop surface
29 1/2 in750 mm41 1/4 in1050 mm
Starts at 900 mm, or 36 in when the sheet is set to inches.
The other 4 sizes, counts and switches
-
Shelf height floor to the top of the shelf
6 in150 mm15 1/2 in400 mm
Starts at 250 mm, or 10 in when the sheet is set to inches.
-
Front overhang worktop past the front legs (room for clamps)
0 in0 mm6 in150 mm
Starts at 50 mm, or 2 in when the sheet is set to inches.
-
Back panel above the worktop
Choices: no, yes (starts here)
-
Back panel height above the worktop
8 in200 mm35 1/2 in900 mm
Starts at 600 mm, or 24 in when the sheet is set to inches.
Your stock
Type the real sizes of the boards and sheets you buy. The spreadsheet starts with these:
- 2x4 board
96 in long, 3 1/2 x 1 1/2 in (2440 mm long, 89 x 38 mm) - Plywood sheet
96 x 48 in, 3/4 in thick (2440 x 1220 mm, 18 mm thick)
Also yours to type
- Saw kerf (blade width)
- Your price for each board or sheet
- 7 advanced settings, each with its own range
A size outside its range is refused: the Status line reads CHECK INPUTS instead of OK.
What changes when you type
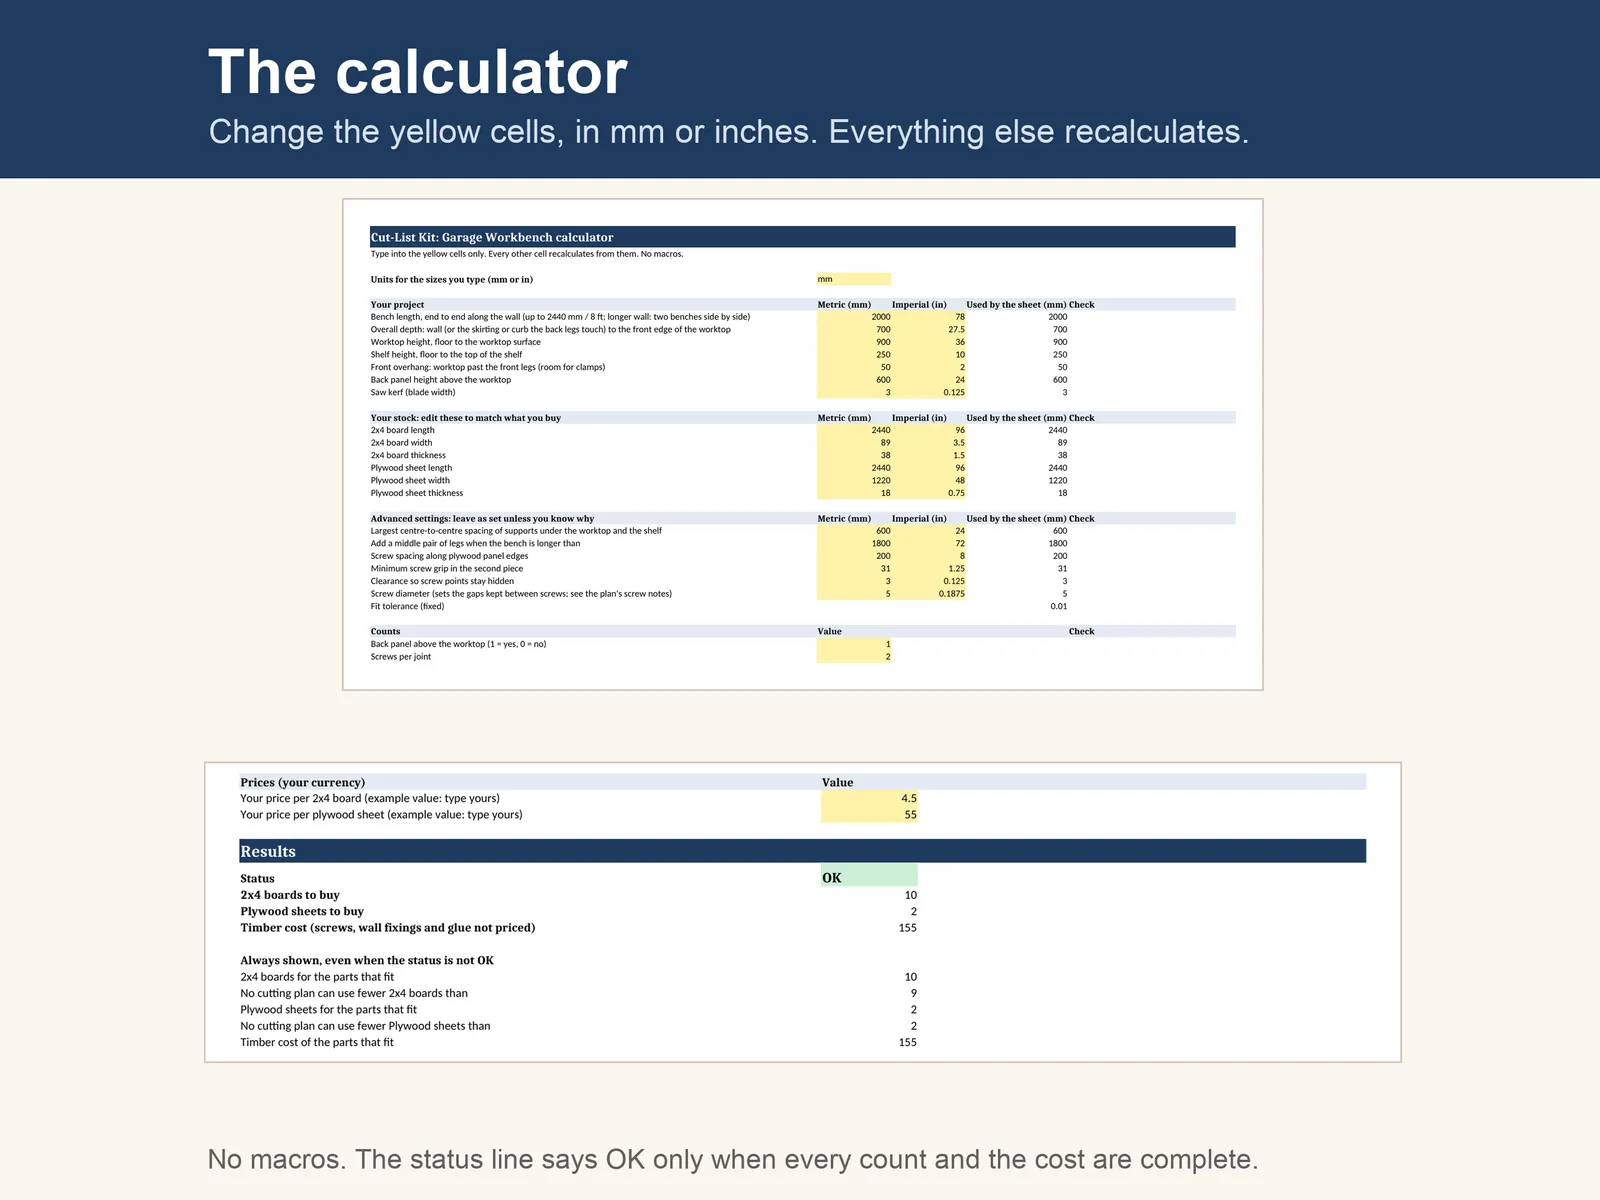
The file arrives set to millimetres, at 2000 x 700 mm, length by depth. At that size it asks for 10 2x4 boards and 2 plywood sheets. Switched to inches it starts from 78 x 27.5 in and asks for 10 and 2.
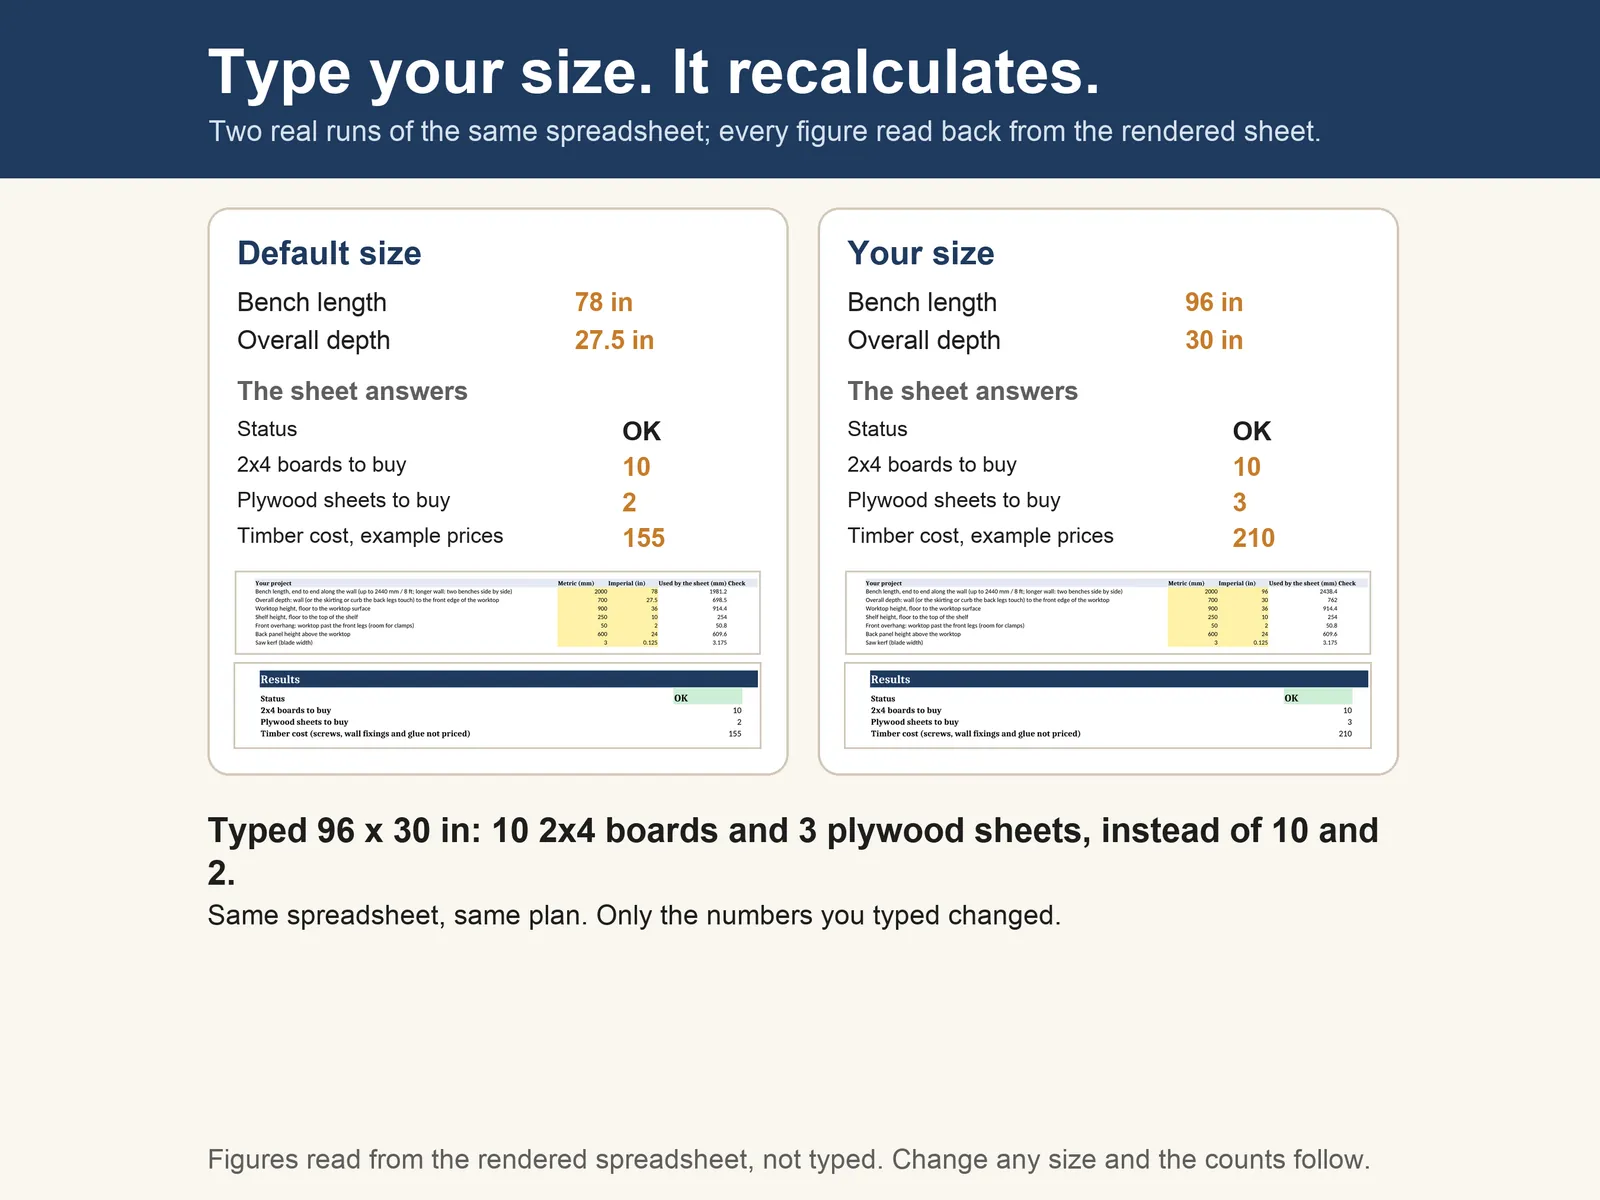
Type a shorter bench, 60 x 24 in, and it asks for 6 boards and 2 sheets. Type the longest one at 96 x 30 in and it asks for 10 boards and 3 sheets.
Switch the back panel off at the inch defaults and the 2x4 count drops from 10 to 9.
The Garage Workbench spreadsheet at three sizes
| Inch default | Smaller | Larger | |
|---|---|---|---|
| You type | |||
| Bench length | 78 in | 60 in | 96 in |
| Overall depth | 27 1/2 in | 24 in | 30 in |
| The spreadsheet answers | |||
| Status | OK | OK | OK |
| 2x4 boards to buy | 10 | 6 | 10 |
| Plywood sheets to buy | 2 | 2 | 3 |
Read back from the file on sale after LibreOffice recalculated it at each size, on 14 Nov 2026. Every other input was left at its inch default.
What is in the download
Four files, with the spreadsheet inside the zip.
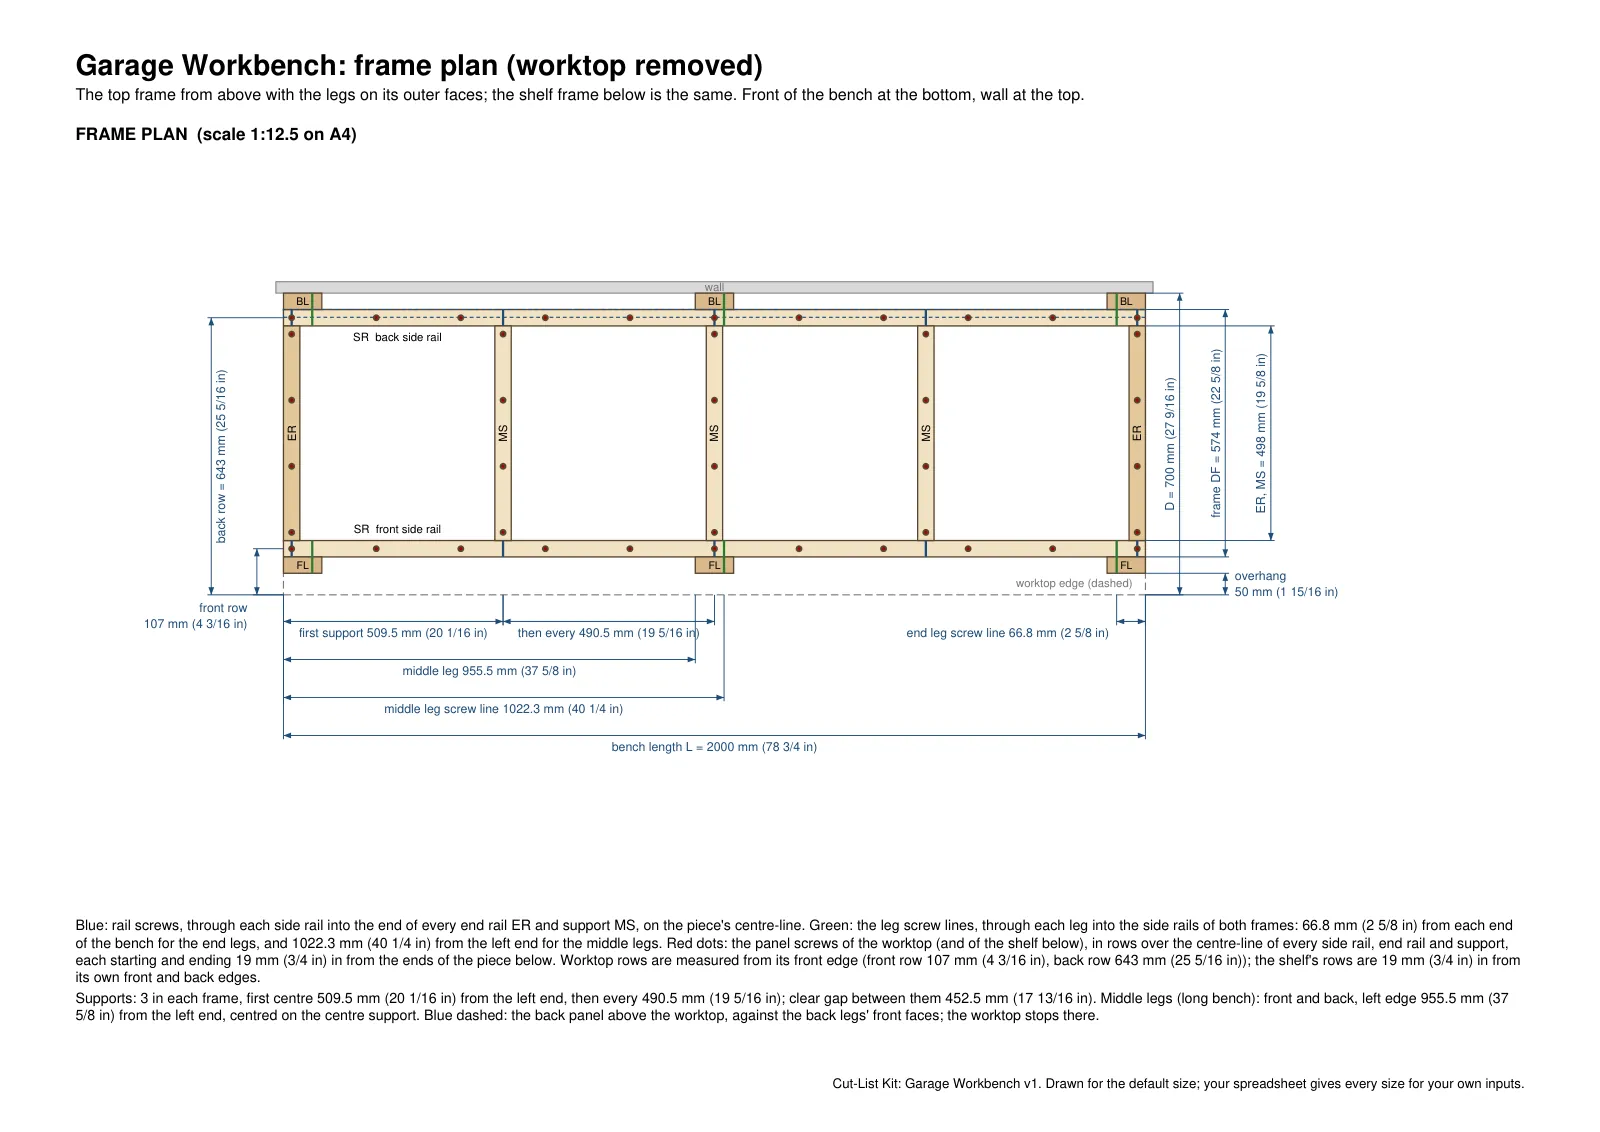
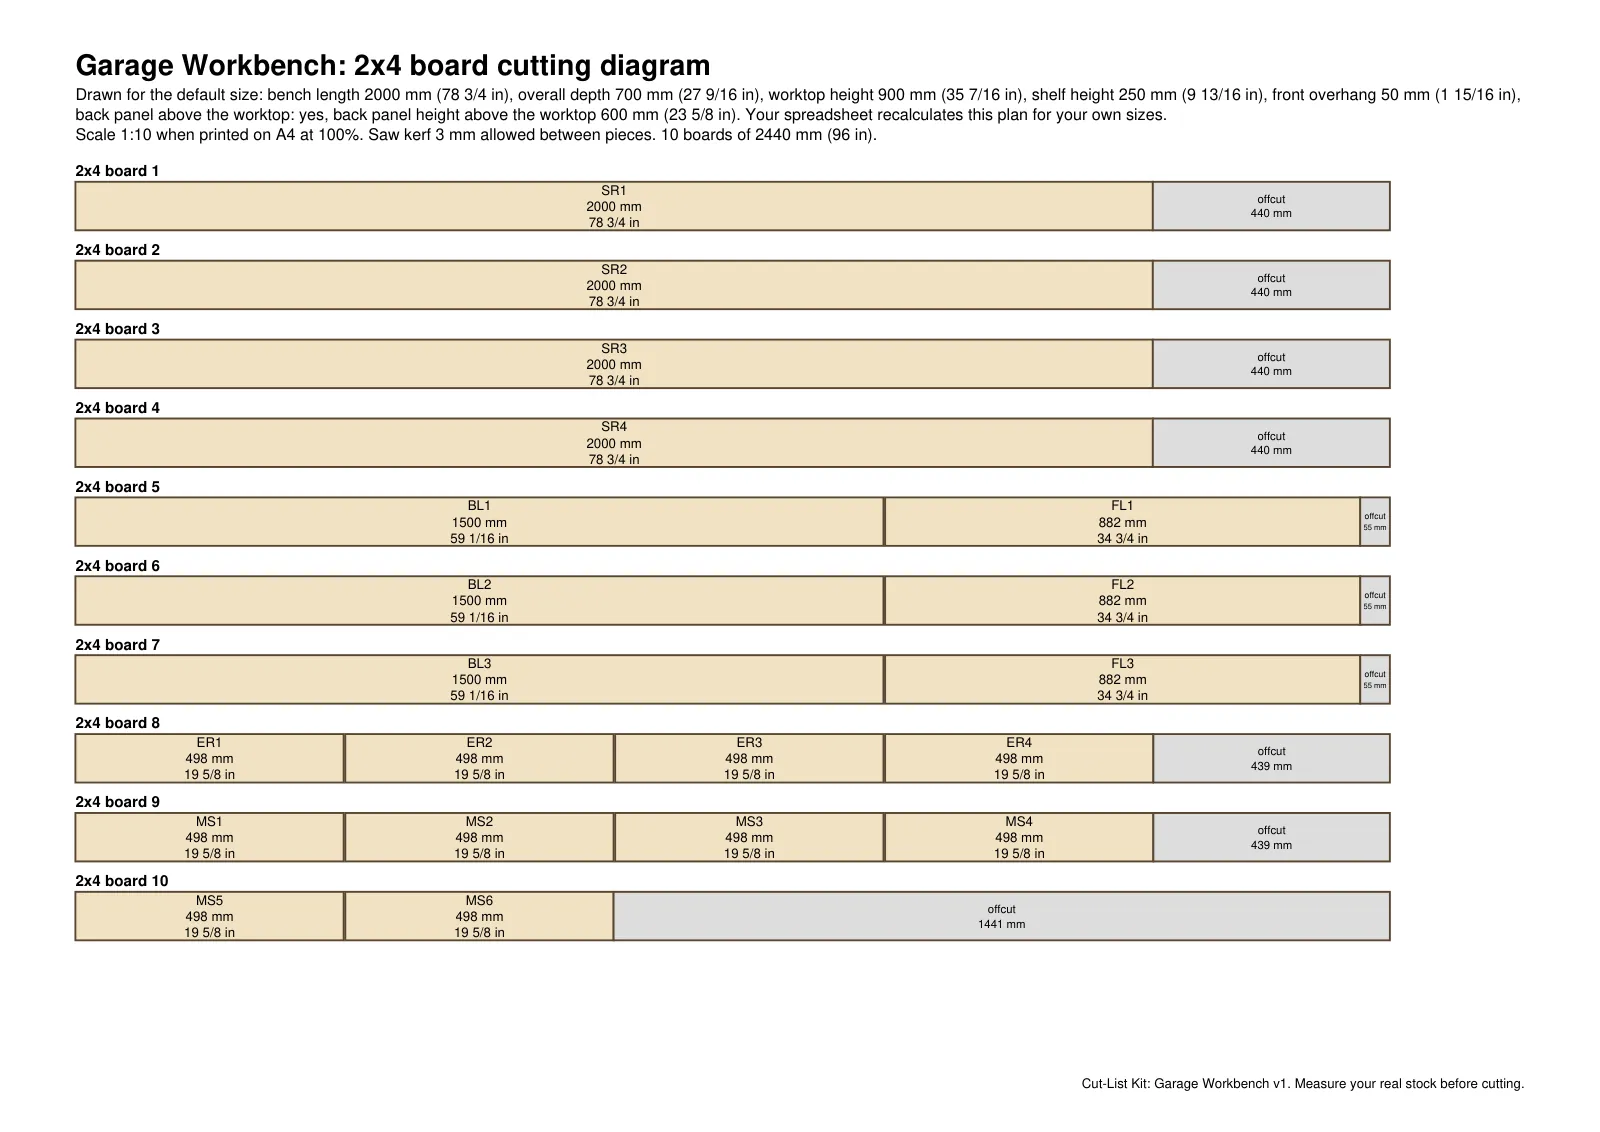
The plan PDF has a frame plan with the worktop removed, a corner detail with the screw heights, and a page for the back legs, the back panel and the wall fixings. In the cutting diagram the 2x4 boards come first, then the plywood.
- cut-list-kit.zip
Holds the spreadsheet itself, plus a copy of each PDF and parts.csv, the cut list in a form any spreadsheet can import. Unzip it on a computer. On a phone, a file-manager app can open it.
- cutlist-calculator.xlsx
- plan.pdf
- cutting-diagram.pdf
- parts.csv
- plan.pdf
9 pages. Drawings with every dimension, the hardware list, 11 numbered build steps and the cut list, all at the default size.
- cutting-diagram.pdf
3 pages: which part is cut from which board or sheet, at the default size.
- parts.txt
The default-size cut list as plain text, for reading on a phone.
Sample pages
How it goes together
The plan PDF has 11 written steps, and the first one is not a cut. It has you measure the wall, find the studs or check that the wall is solid masonry, and type your sizes. It says to cut nothing until the Status line reads OK.
The seven pictures show the timber only: the two frames, the shelf, the legs, the worktop and the back panel. Fixing the bench to the wall is step 8 in the PDF and is not pictured.
The written steps were drafted with AI help. The drawings and the cut list are generated by code from one model of the build.
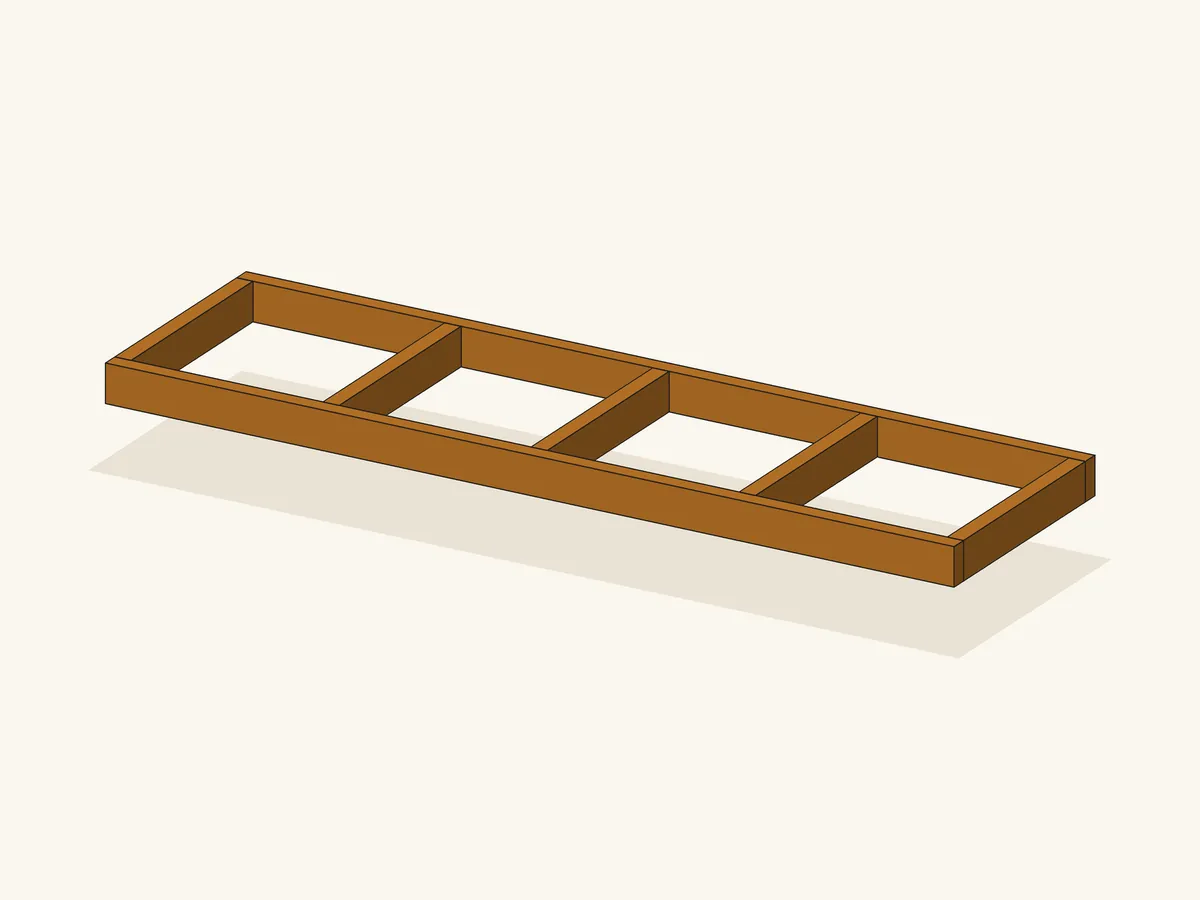
Shelf frame: side rails, end rails and supports
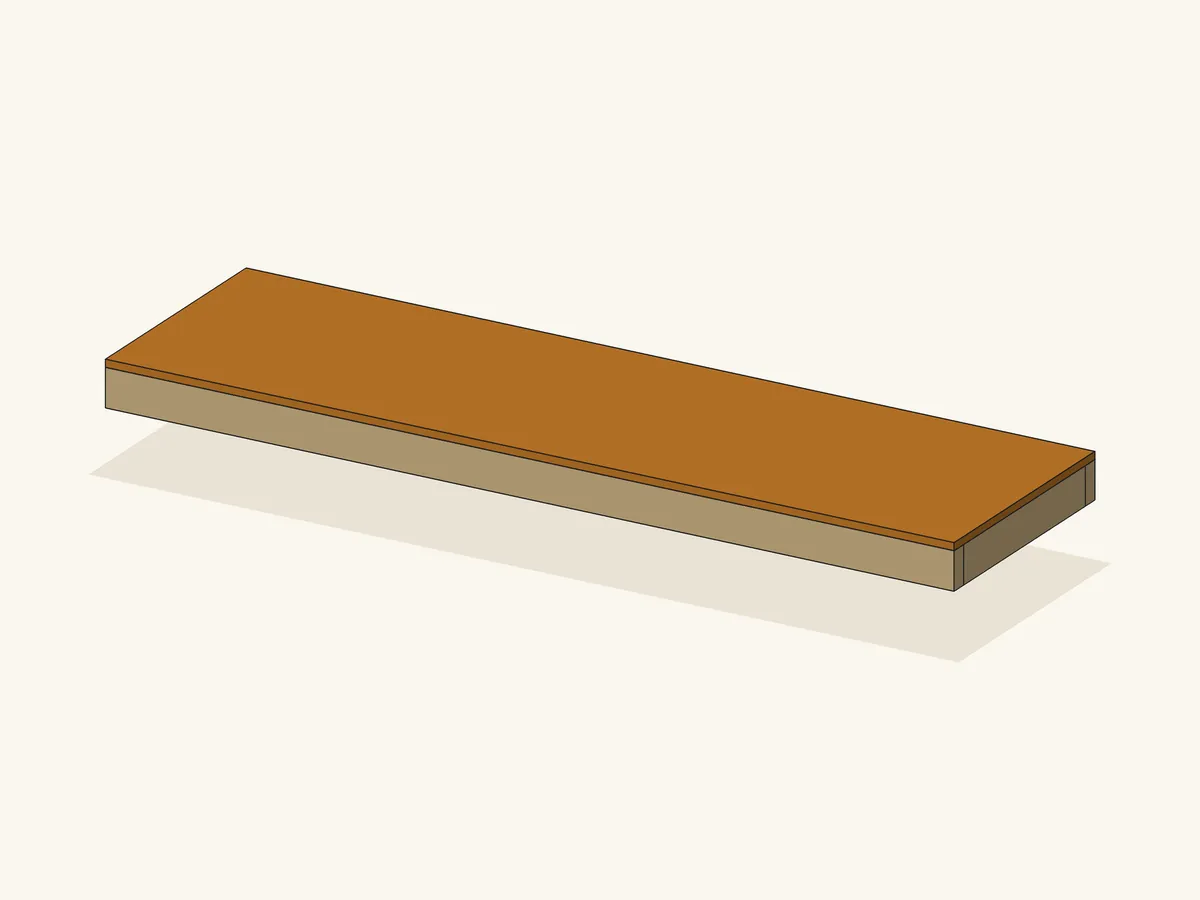
Shelf panel on the shelf frame, flush all round
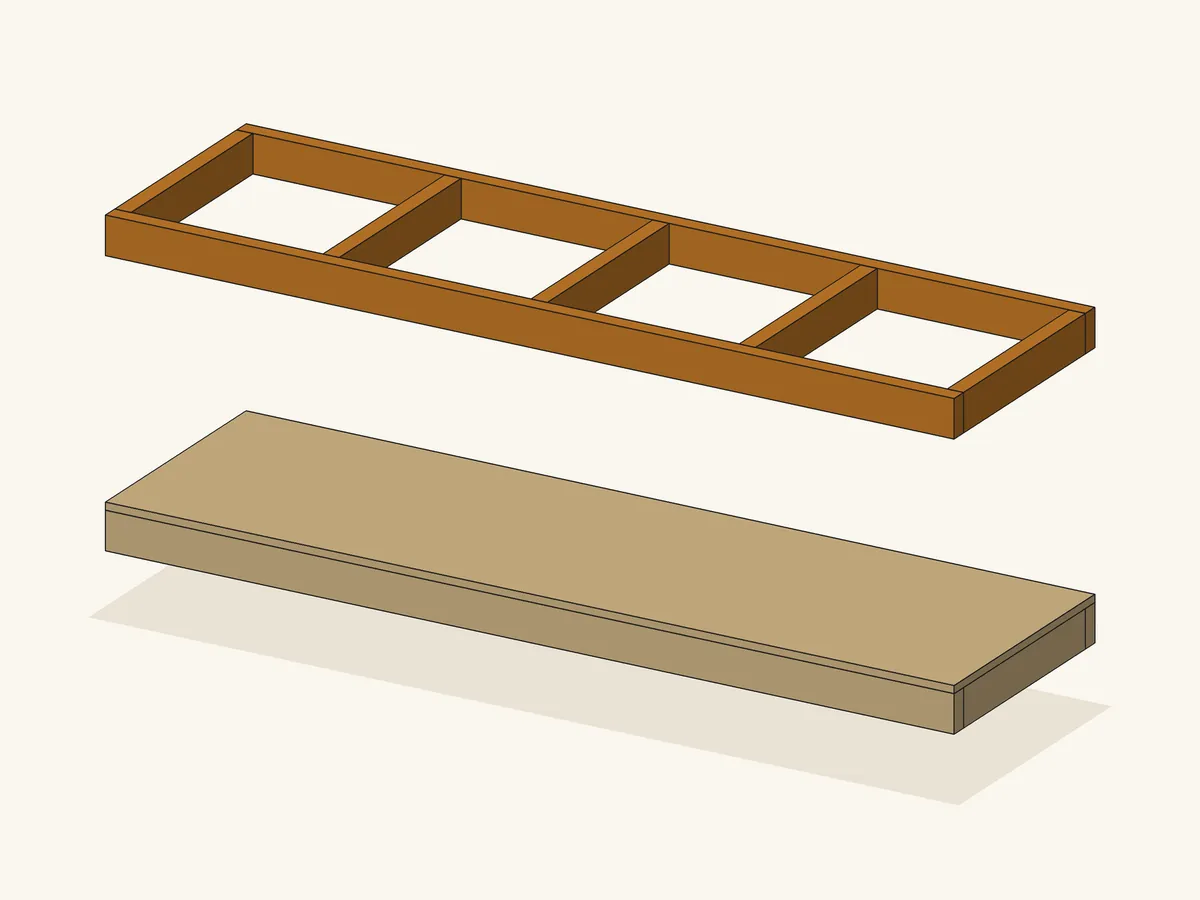
Top frame built the same way, on spacer blocks
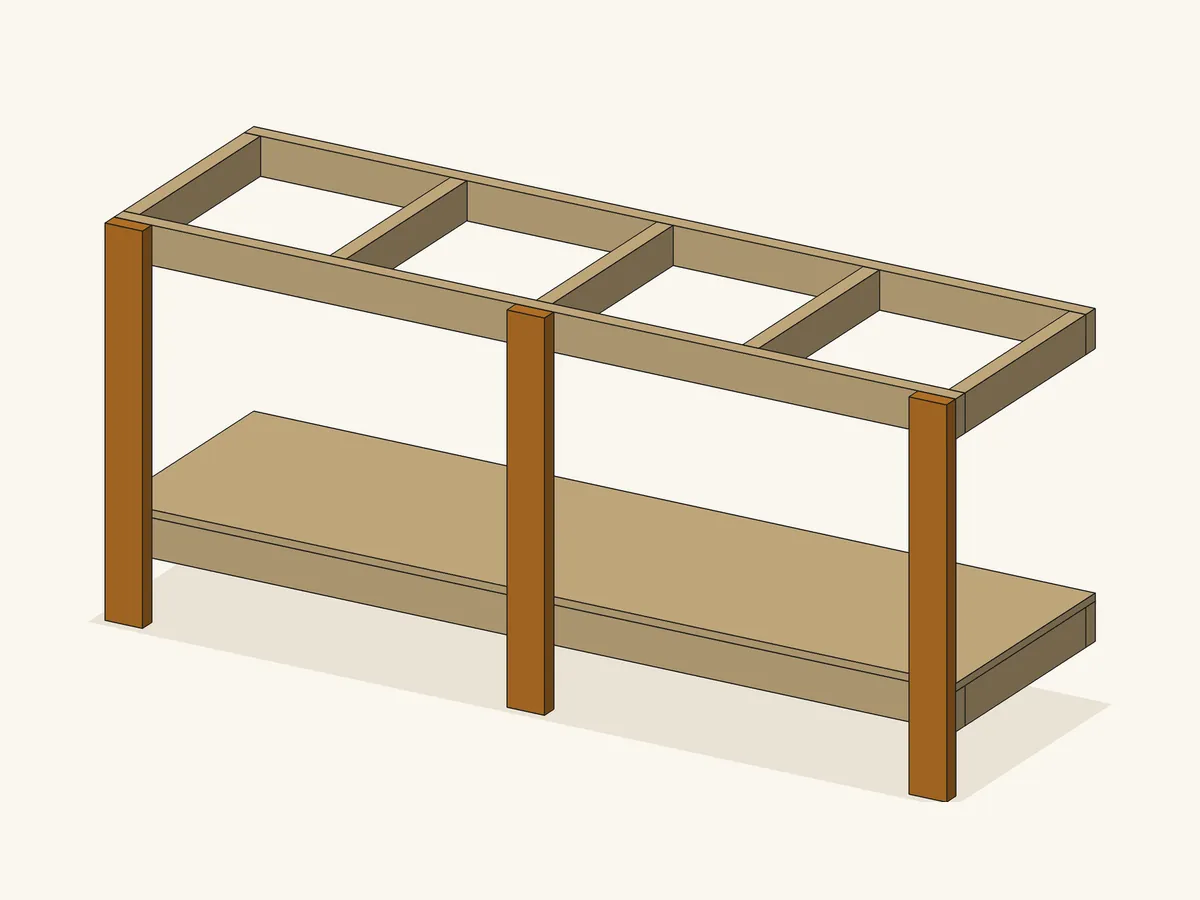
Front legs flat across the front faces of both frames
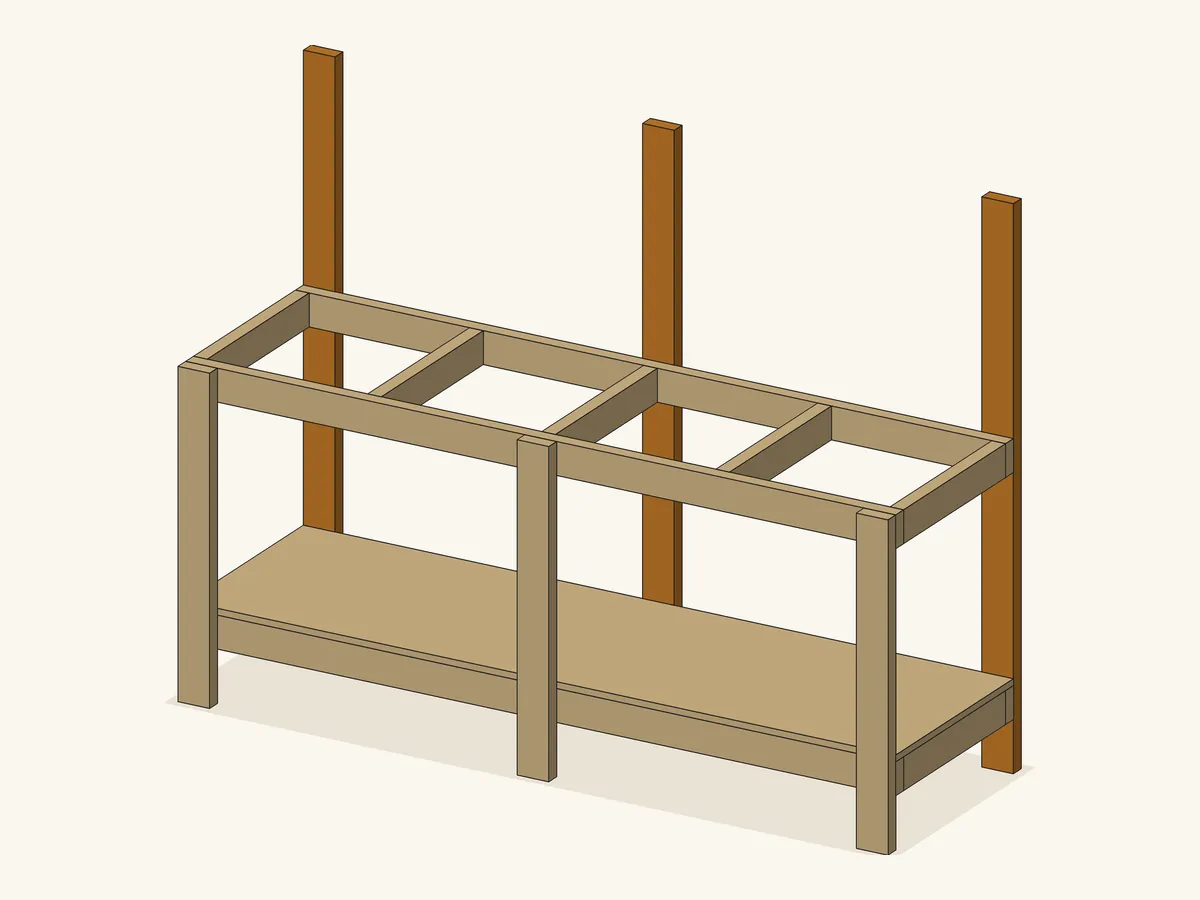
Back legs across the back faces of both frames
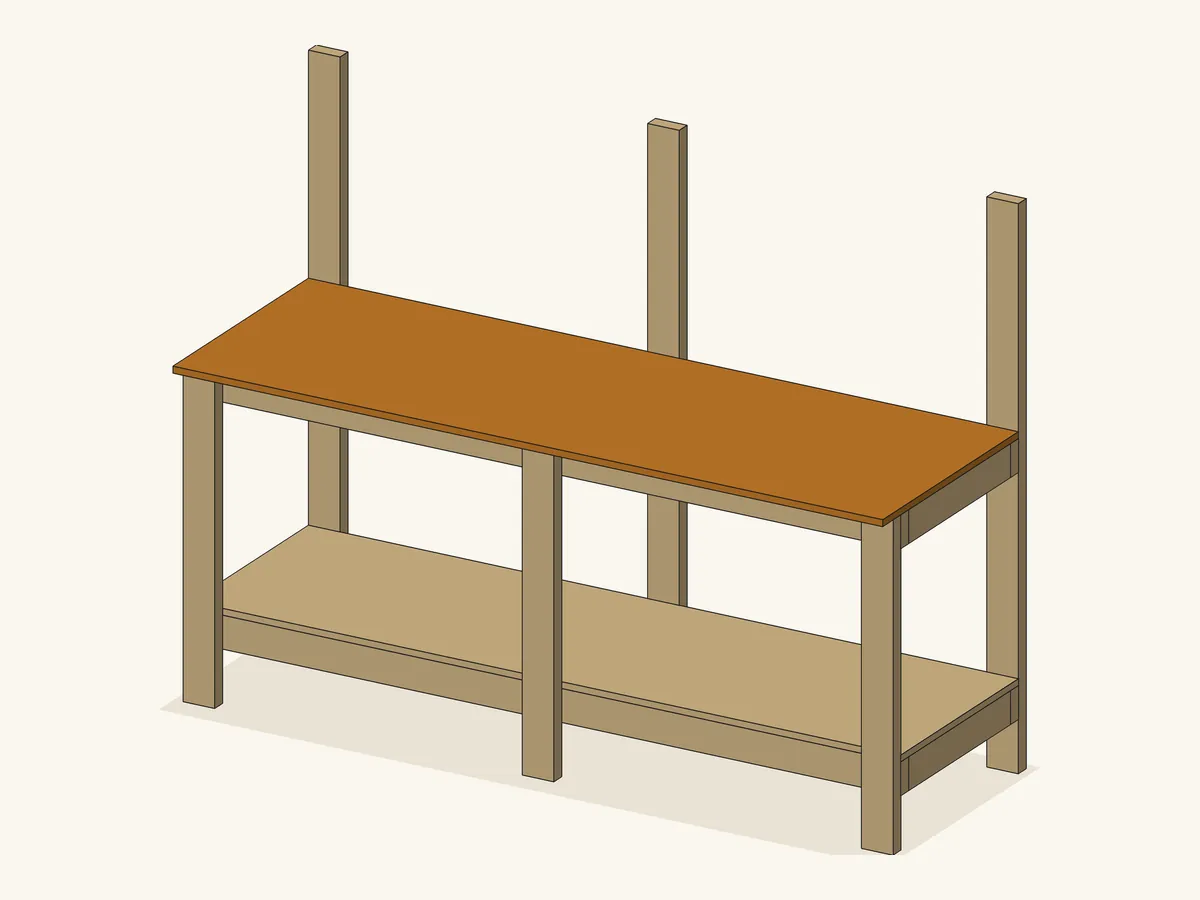
Worktop on the top frame, overhanging the front legs
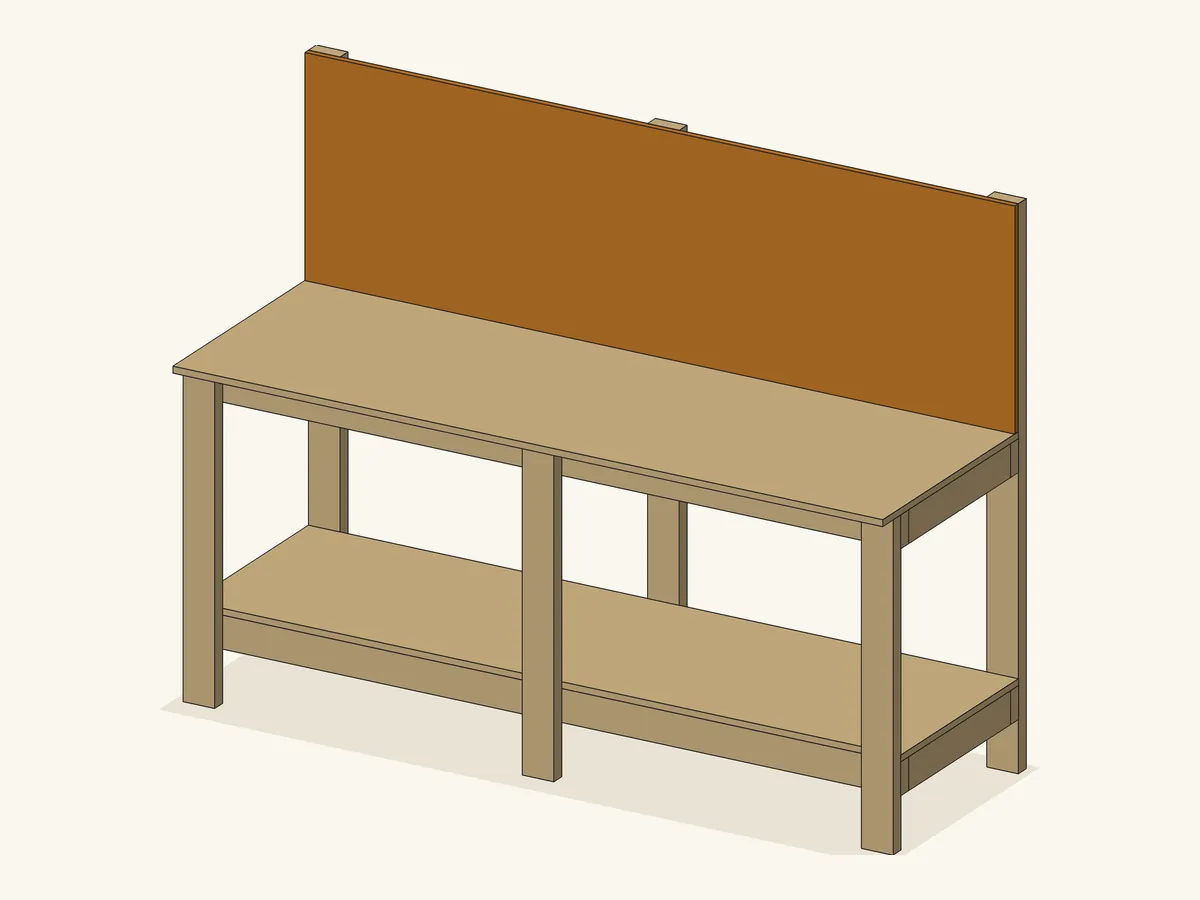
Back panel stands on the worktop against the back legs
Software renderThe 7 pictures show the main stages at the default size, drawn from the plan's own part sizes. They are not photographs. The plan PDF has all 11 written steps.
What you need
Two materials, 2x4 boards and plywood sheets. At the default size the cut list has four side rails, four end rails, six supports and six legs in 2x4, and three plywood panels: worktop, shelf and back panel.
The hardware list counts the screws in four groups, plus 6 wall fixings at the default size. Which fixings to use, and how long, depends on your wall, so that choice is left to you. It also does not count the extra fixing for each stud the back legs miss, because that depends on where your studs are.
Spacer blocks and packers come from offcuts. They are not on the cut list.
Stock at the default size
- 102x4 boards
- 2plywood sheets
Your own size changes these counts. The spreadsheet gives the new ones.
Counted, not priced
Rail screws, leg screws, panel screws, back panel screws, wall fixings, wood glue.
The spreadsheet totals the timber cost from the prices you type. Hardware is counted or measured, not priced: screws, wall fixings and glue not priced.
Tools the plan names
- Circular saw or table saw
- Drill/driver
- Square
- Level
- Clamps
Opening the spreadsheet
The file is cutlist-calculator.xlsx. It has no macros, so nothing needs enabling.
This kit's file was tested in LibreOffice, which is free. We have not tested it in Excel, Google Sheets or Apple Numbers, so we do not promise it works there.
The test record for this file
- 46,735automated checks
- 0failed
- 56sets of inputs: 43 inside the ranges, 13 bad ones that must be refused
- 28 Oct 2026date of the test report
The test compares the spreadsheet with a separate program's results. It covers the arithmetic and the cutting plan, not the design, and it is not a physical build. How we check every kit
What this plan does not do
This is a plan and a calculator, not an engineered product. It gives no figure for the weight the worktop or the shelf will carry, and no promise that the bench fits your wall or floor. The plan's own wording follows in full, including what it says about fixing the bench to the wall. Read it before you buy.
Safety note, as printed in the plan
- This is a plan for a stationary workbench.
- It makes no load, weight, strength or stability rating of any kind, and no promise that it fits your wall, your floor or your space.
- Nobody should stand, sit, kneel or climb on the worktop, the shelf, the frames or the back panel.
- Fix the bench to the wall as build step 8 says (through the back legs, and through the top frame into every stud the back legs miss), and always before anything is hung on the back panel: a loaded back panel pulls the bench forward, and a tall bench can tip.
- Fix into wall studs or solid masonry; hollow-wall anchors alone are not enough to hold it.
- Check every part against the cut list before assembly.
One sentence per line here; the words are the plan's own.
10 things the spreadsheet does not work out
- Wood grain direction, knots, warp or other defects in your stock.
- Trimming factory ends or edges beyond the saw kerf you enter.
- The price of screws, wall fixings and glue (they are counted, not priced).
- Board-feet: boards and sheets are counted as whole pieces.
- A guaranteed minimum number of boards: the plan is good, but not proven to be the fewest possible.
- Your wall: the type and length of the wall fixings depend on your wall (studs or masonry) and are not computed; the back-leg fixings are counted, but the extra stud fixings and their packers (one each for every stud the back-leg fixings miss, build step 8) depend on where your studs are and are not counted.
- Spacer blocks for assembly, stud packers and skirting packers: cut them from offcuts or scrap; they are not in the cut list.
- Floor flatness: the worktop height assumes a level floor; pack hard shims under any leg that needs it.
- Pegboard, hooks, tool rails, lights or outlets on the back panel.
- Any load, weight, strength or stability rating.
The list is copied from the kit's own files, so it matches what you download.
An AI picture of the finished build
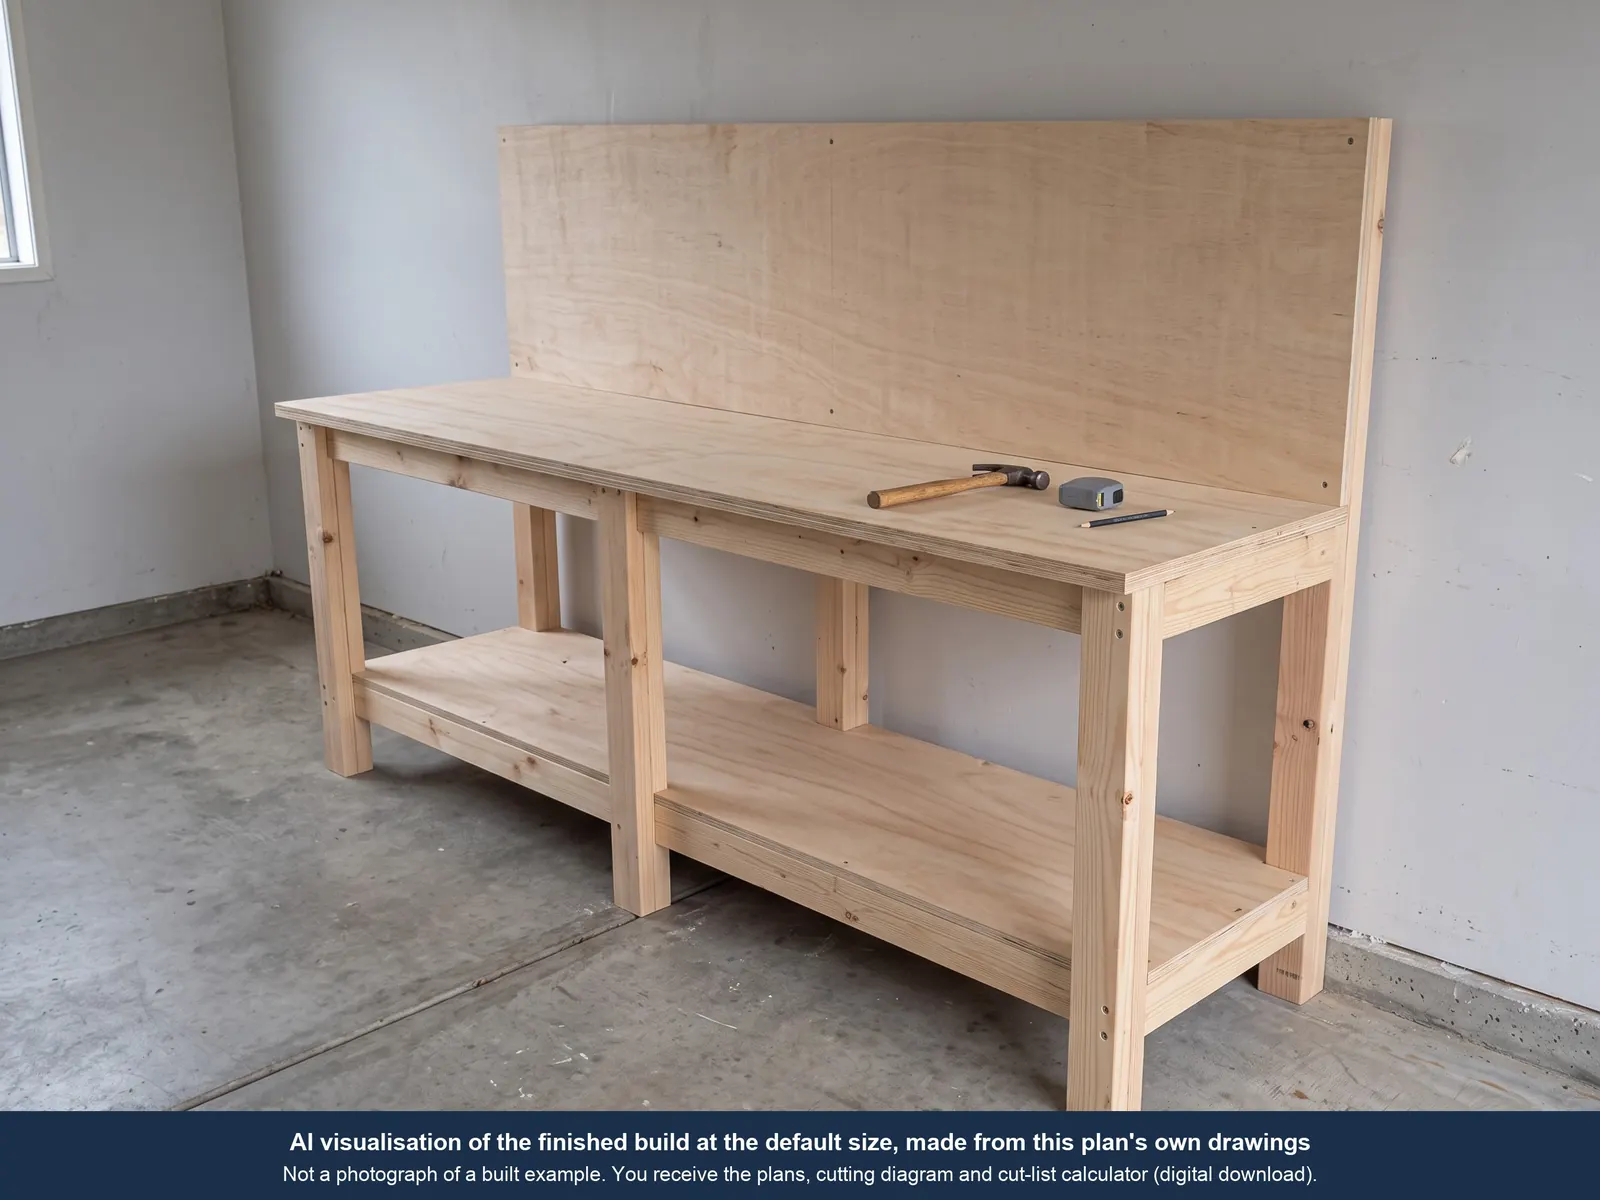
This picture was made by an AI image tool from the plan's drawings. It is not a photograph, and we have not built or photographed a bench from this plan.
Treat it as a rough impression. The garage, the tools on the worktop and the wood grain are the AI's invention, and no wall fixings can be seen in it. The drawings and the cut list are what you build from.
Questions about this kit
How long can the bench be?
From 36 to 96 in (900 to 2440 mm). The spreadsheet refuses a longer one. For a longer wall, the plan says to build two benches side by side.
Does it have to be fixed to the wall?
The plan says yes, and it makes that step 8, before the worktop goes on. The fixings go through the back legs into wall studs or solid masonry. The plan's safety note is printed in full above. The fixings themselves are not chosen for you, because they depend on your wall.
How much weight will it hold?
The plan gives no figure. It rates nothing for load, weight, strength or stability, and it says the bench is not for standing, sitting or climbing on.
Can I leave the back panel off?
Yes. Type 0 in its cell. The back legs then stop level with the top frame and the panel leaves the cut list. With it on, you type its height above the worktop, from 8 to 35 1/2 in.
Can I change the shelf height?
Yes. The top of the shelf can sit from 6 to 15 1/2 in above the floor. The file starts at 250 mm, or 10 in when set to inches.
Which program opens the spreadsheet?
LibreOffice Calc, which is free. It is the program this kit's file was tested in. We have not tested it in Excel, Google Sheets or Apple Numbers.
Garage Workbench Cut-List Kit
Digital download: nothing is shipped. Opens our Etsy listing in a new tab. You pay on Etsy and Etsy delivers the files. This site takes no payment.
Price as listed on Etsy on 16 Nov 2026. Etsy may add tax, such as VAT, at checkout. If Etsy shows a different price, the Etsy price applies.
Questions first? Message us on Etsy (opens in a new tab). See refunds and delivery.