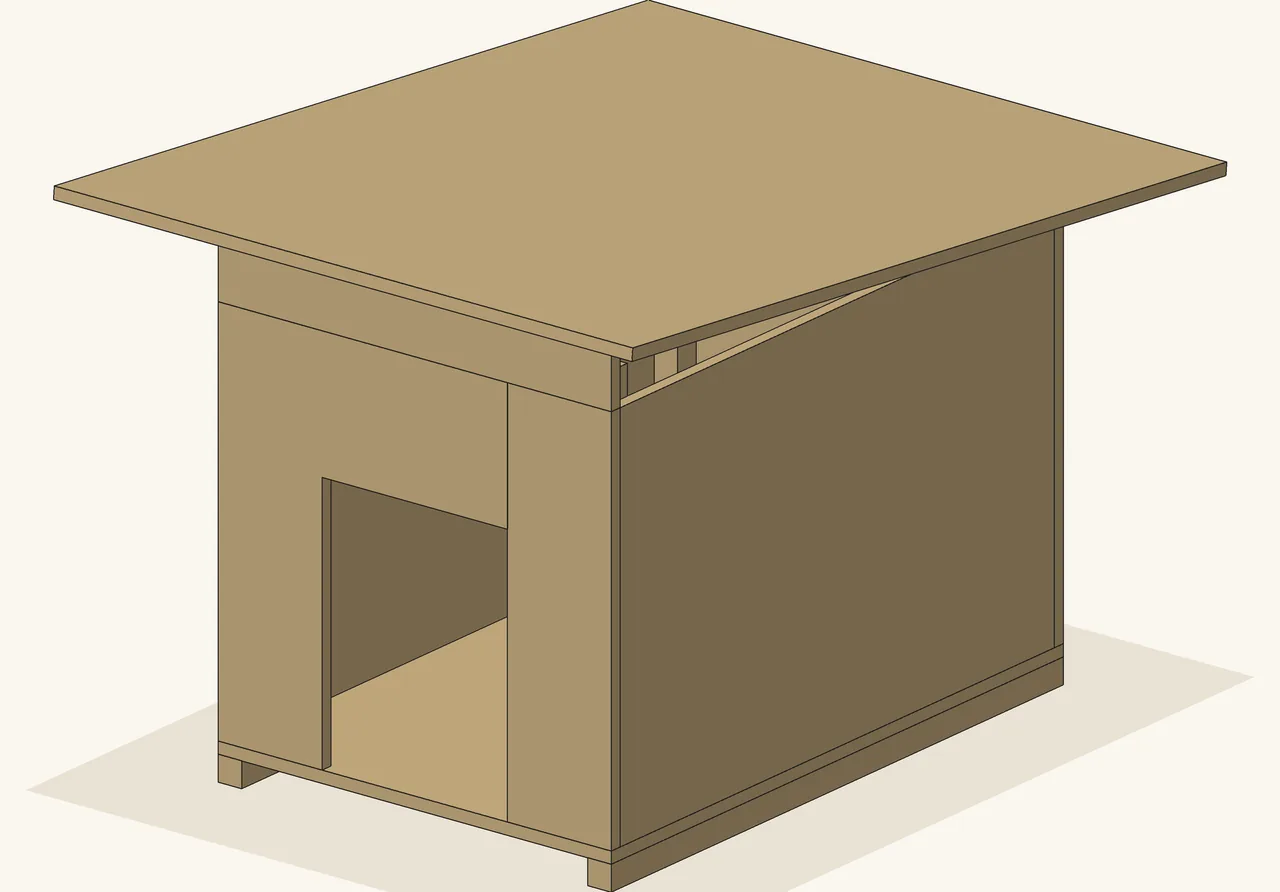
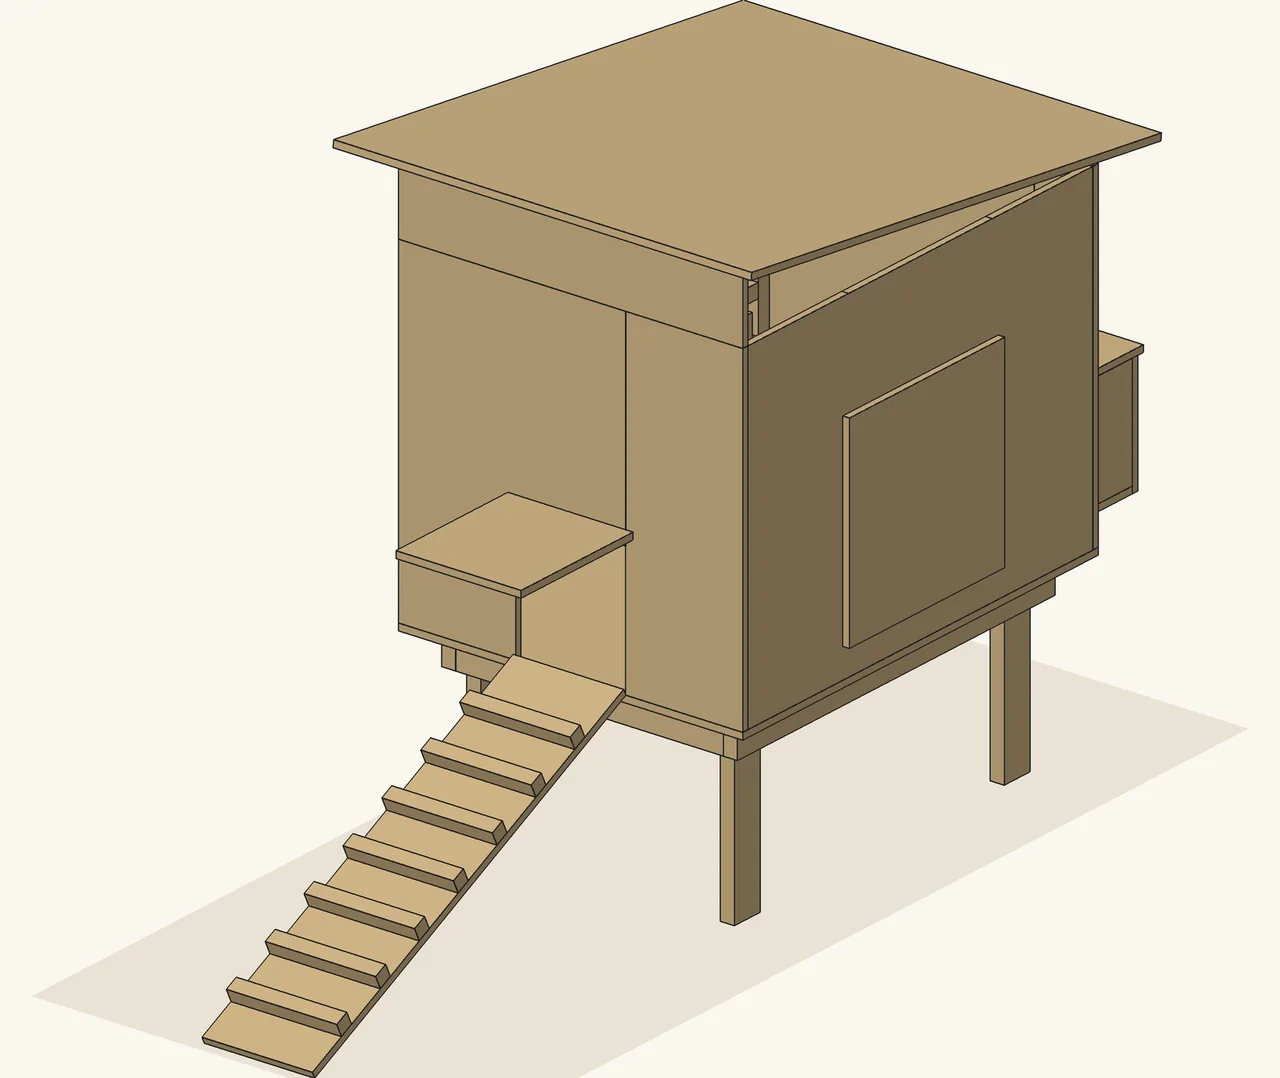
Cut-List Kit: plan PDF + spreadsheet
Outdoor cat shelter plans that recalculate to your size
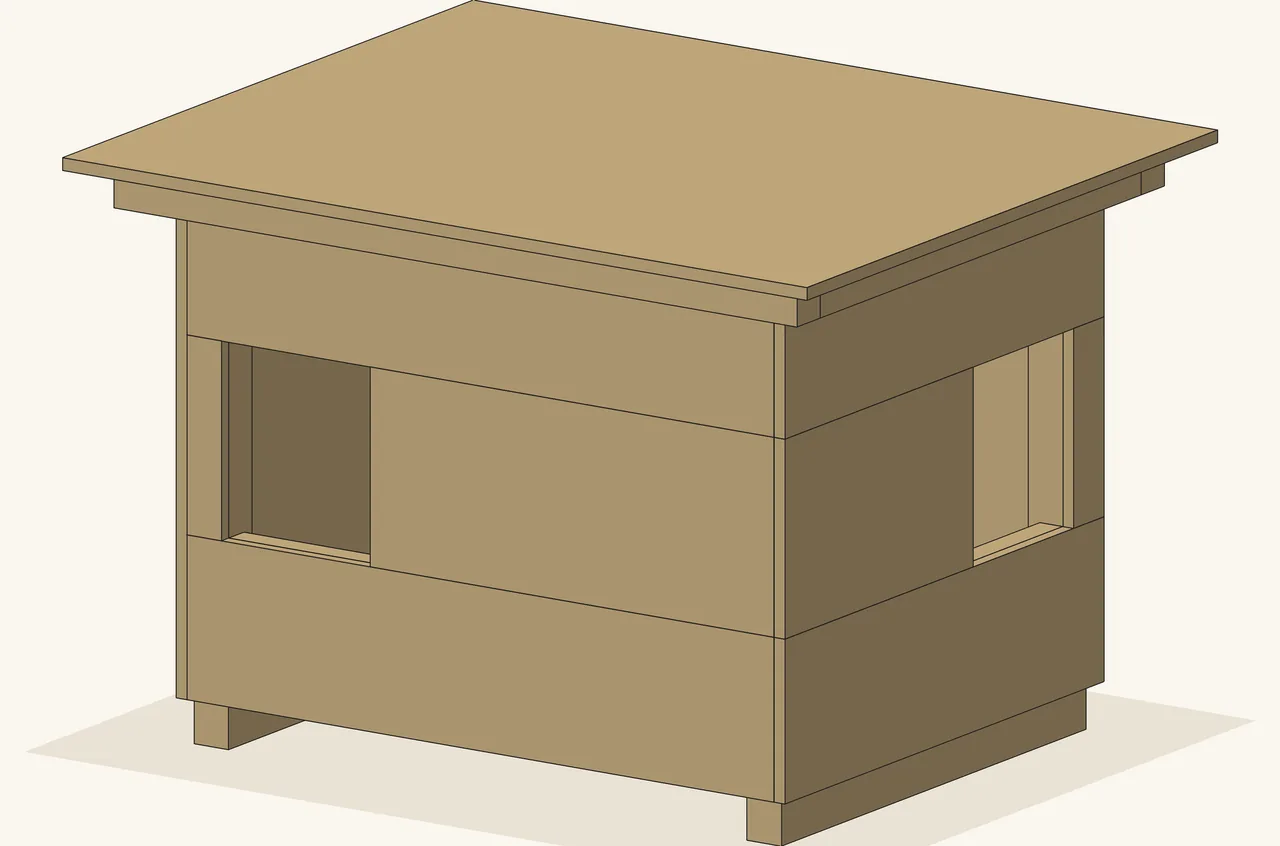
A plywood shelter box for outdoor cats, on two skids, with a lid that lifts off. Type the clear space you want inside and the doorway size. The spreadsheet gives you the cut list for the plywood, the timber and the foam board liner, and the sheets and boards to buy.
Digital download: nothing is shipped. Opens our Etsy listing in a new tab. You pay on Etsy and Etsy delivers the files. This site takes no payment.
Price as listed on Etsy on 16 Nov 2026. Etsy may add tax, such as VAT, at checkout. If Etsy shows a different price, the Etsy price applies.
At a glance
- 18 to 35 inInside width (450 to 900 mm)
- 14 to 24 inInside depth (350 to 610 mm)
- 12 to 22 inInside height (300 to 560 mm)
- 3 sheets, 4 boardsto buy as the file arrives (mm default): 2 x exterior plywood sheets, 3 x 2x2 boards, 1 x 2x4 board, 1 x rigid foam board
- 9build steps in the plan PDF
- 10 + 5pages: plan PDF and cutting diagram PDF
- mm or inone switch in the spreadsheet
- No macrostested in LibreOffice
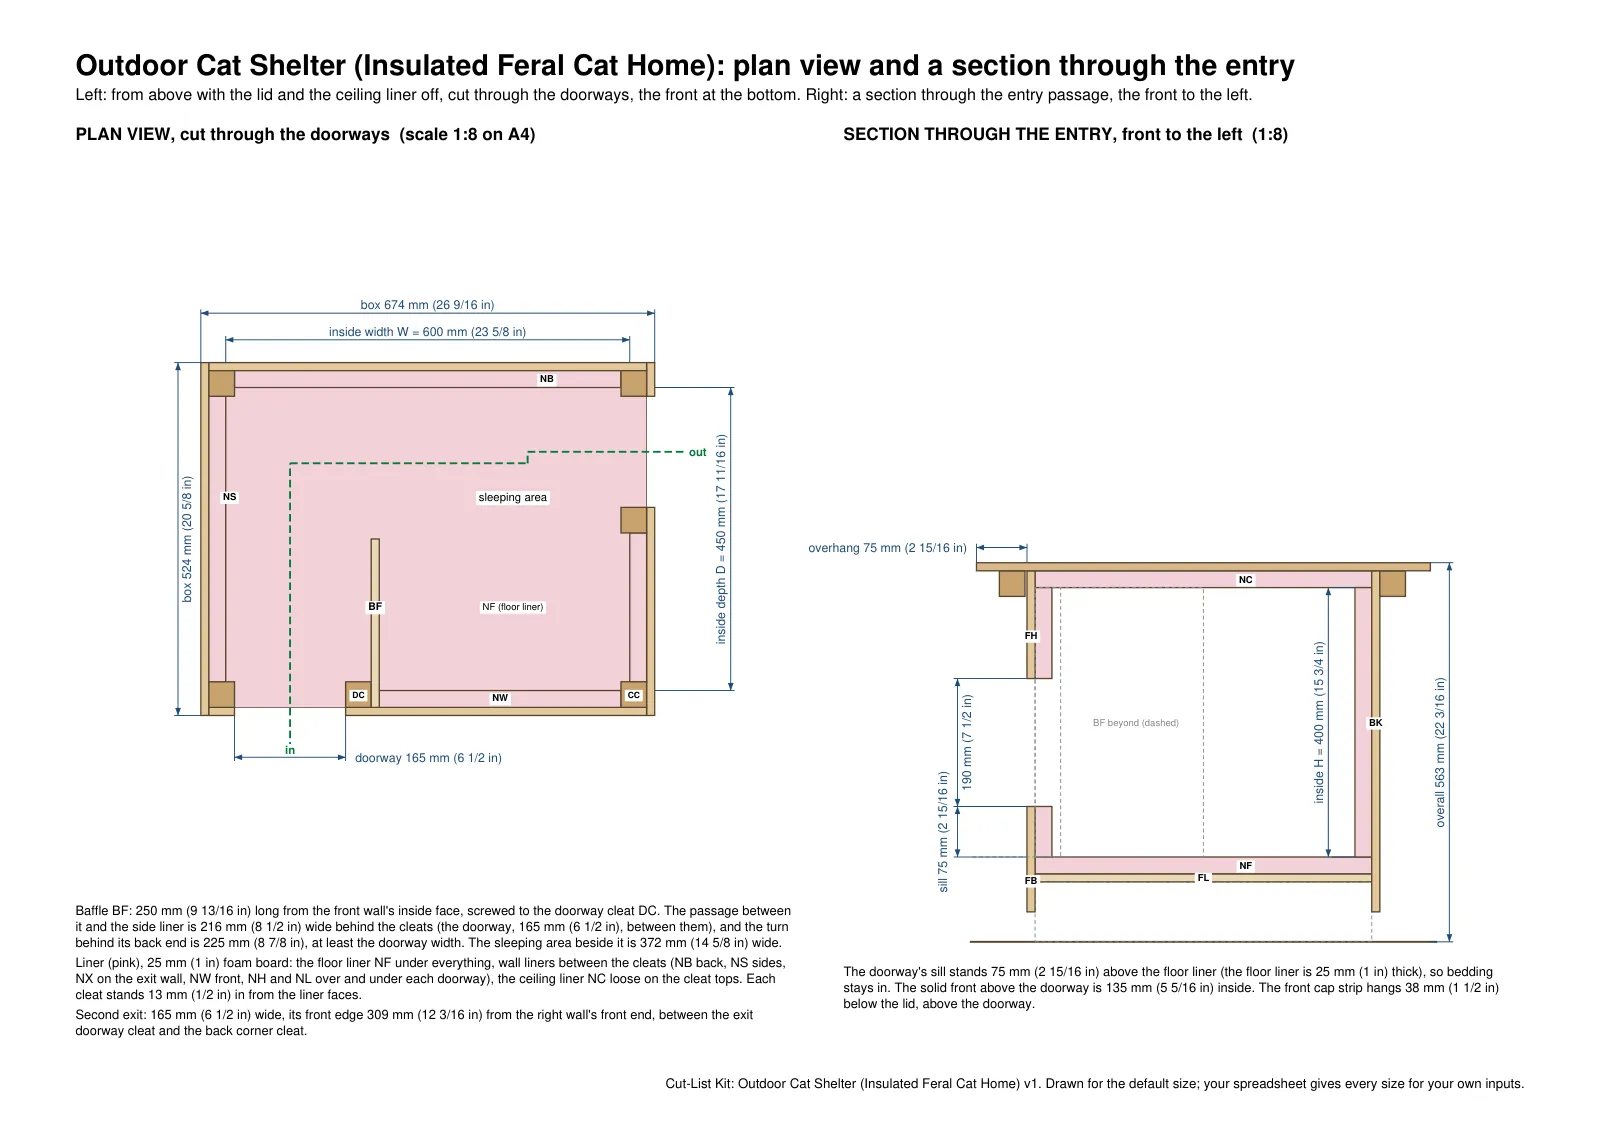
The shelter is a plywood box standing on two 2x4 skids, set on edge so the floor panel stays off the ground. Each inside corner has a 2x2 cleat, and the two walls that meet there are screwed to it.
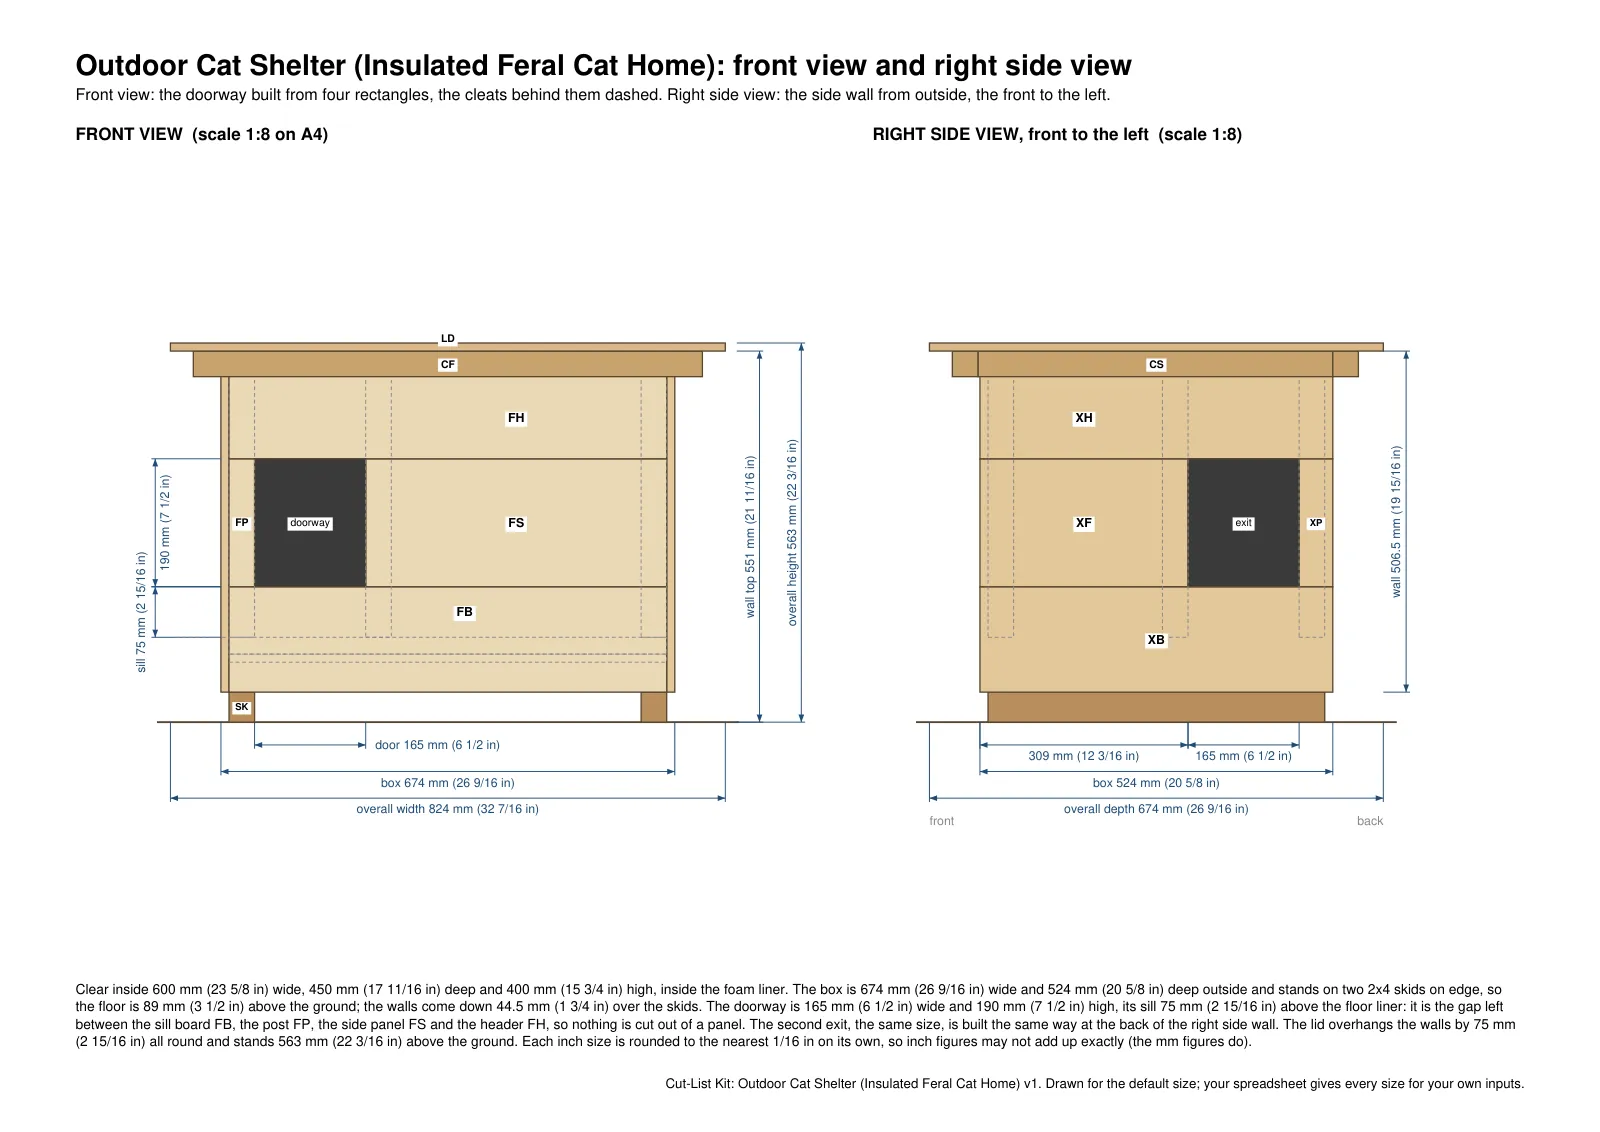
Nobody cuts a hole for the doorway. The front wall is made of four separate rectangles: a low board at the bottom, a narrow upright, a wide panel and a board across the top. The space between them is the opening. It sits off to one side, with its bottom edge above the floor.
Three more parts are switches, and the file arrives with all three on. A second way out, made from rectangles in the same way, sits near the back of the right side wall, at the far corner from the doorway. Inside, a plywood baffle makes the entrance a short corridor. And rigid foam board lines the inside: floor, walls and ceiling.
The lid sits on the wall tops and reaches past them all round. Four 2x2 strips on its underside stop it sliding, so it lifts straight off. A fourth switch hinges it at the back instead, on two hinges you buy.
It is for someone who puts out shelter for outdoor, stray or feral cats and wants the box sized to the spot they have. No panel has a hole cut in it, and nothing is cut at an angle. There is no heating and nothing electrical in the plan.
Sizes you can type
Ten sizes and switches are yours to set. The width, depth and height are the clear space inside the foam liner. The spreadsheet builds the box bigger by the liner and the plywood, so the space you typed stays clear.
Only the 2x2 cleats and the baffle stand inside that space. The cut list prints the width of the entry passage and of the sleeping area beside the baffle.
The plan does not turn a number of cats into a size. You choose it.
If the doorway height you type leaves too little wall above it, the spreadsheet uses a shorter doorway and the cut list shows the height used.
-
Inside width side to side (clear width inside the liner)
18 in450 mm35 in900 mm
Starts at 600 mm, or 24 in when the sheet is set to inches.
-
Inside depth front to back (clear depth inside the liner)
14 in350 mm24 in610 mm
Starts at 450 mm, or 18 in when the sheet is set to inches.
-
Inside height (clear, from the floor liner up to the ceiling liner)
12 in300 mm22 in560 mm
Starts at 400 mm, or 16 in when the sheet is set to inches.
The other 7 sizes, counts and switches
-
Doorway width (the same for the second exit)
5 1/2 in140 mm7 7/8 in200 mm
Starts at 165 mm, or 6 1/2 in when the sheet is set to inches.
-
Doorway height (the same for the second exit)
5 1/2 in140 mm11 3/4 in300 mm
Starts at 190 mm, or 7 1/2 in when the sheet is set to inches.
-
Doorway sill bottom of each doorway above the floor liner
2 in50 mm3 1/2 in90 mm
Starts at 75 mm, or 3 in when the sheet is set to inches.
-
Second exit doorway in the right side wall
Choices: no, yes (starts here)
-
Inner baffle wall
Choices: no, yes (starts here)
-
Foam board liner inside the whole box
Choices: no, yes (starts here)
-
Lid on two bought hinges at the back
Choices: no: a lift-off lid (starts here), yes
Your stock
Type the real sizes of the boards and sheets you buy. The spreadsheet starts with these:
- Exterior plywood sheet
96 x 48 in, 1/2 in thick (2440 x 1220 mm, 12 mm thick) - 2x2 board
96 in long, 1 1/2 x 1 1/2 in (2440 mm long, 38 x 38 mm) - 2x4 board
96 in long, 3 1/2 x 1 1/2 in (2440 mm long, 89 x 38 mm) - Rigid foam board
96 x 48 in, 1 in thick (2440 x 1220 mm, 25 mm thick)
Also yours to type
- Saw kerf (blade width)
- Your price for each board or sheet
- 5 advanced settings, each with its own range
A size outside its range is refused: the Status line reads CHECK INPUTS instead of OK.
What changes when you type
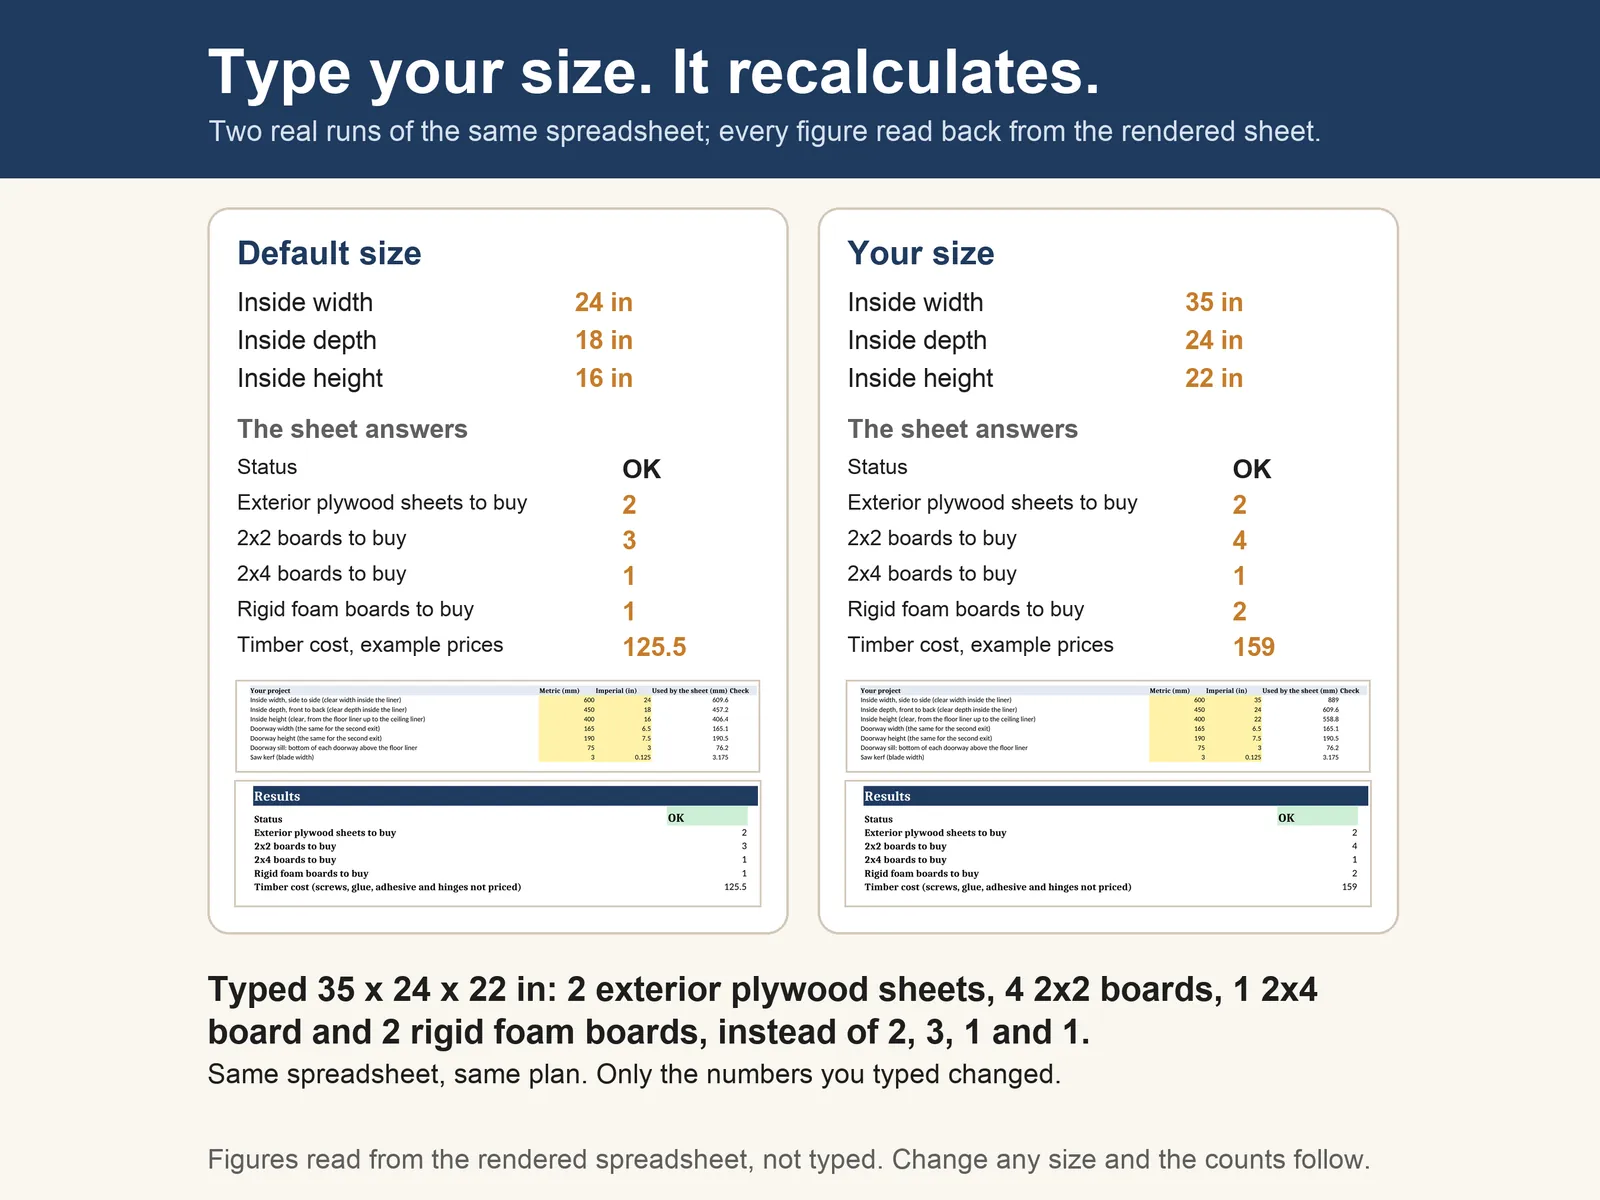
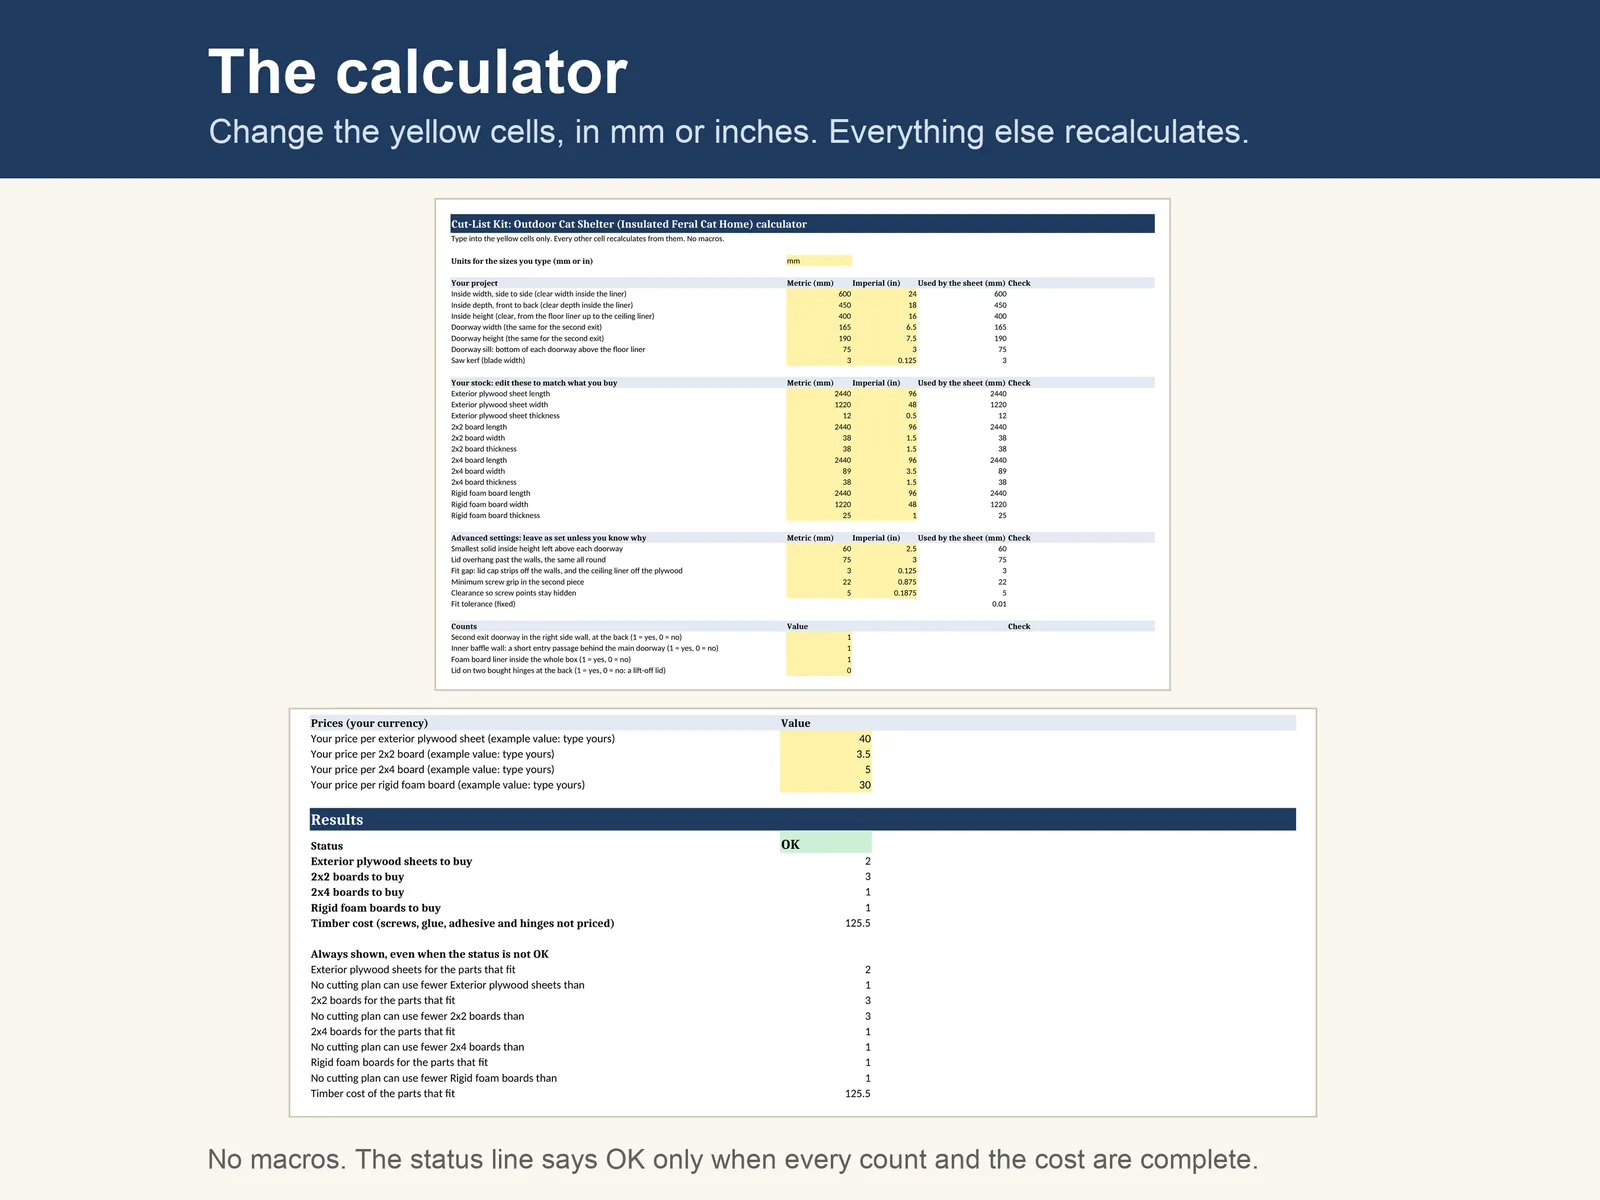
The file arrives set to millimetres, at 600 x 450 x 400 mm inside. At that size it asks for 2 exterior plywood sheets, 3 2x2 boards, 1 2x4 board and 1 rigid foam board. Switched to inches it starts from 24 x 18 x 16 in and asks for 2, 3, 1 and 1.
Type the smallest box in the table, 18 x 14 x 12 in, and it asks for 1 plywood sheet and 2 2x2 boards. Type the largest, 35 x 24 x 22 in, and it asks for 2 sheets, 4 2x2 boards and 2 foam boards.
Switch the liner off at the default size and the foam count goes to 0.
The Outdoor Cat Shelter spreadsheet at three sizes
| Inch default | Smaller | Larger | |
|---|---|---|---|
| You type | |||
| Inside width | 24 in | 18 in | 35 in |
| Inside depth | 18 in | 14 in | 24 in |
| Inside height | 16 in | 12 in | 22 in |
| The spreadsheet answers | |||
| Status | OK | OK | OK |
| Exterior plywood sheets to buy | 2 | 1 | 2 |
| 2x2 boards to buy | 3 | 2 | 4 |
| 2x4 boards to buy | 1 | 1 | 1 |
| Rigid foam boards to buy | 1 | 1 | 2 |
Read back from the file on sale after LibreOffice recalculated it at each size, on 14 Nov 2026. Every other input was left at its inch default.
What is in the download
Four files, with the spreadsheet inside the zip.
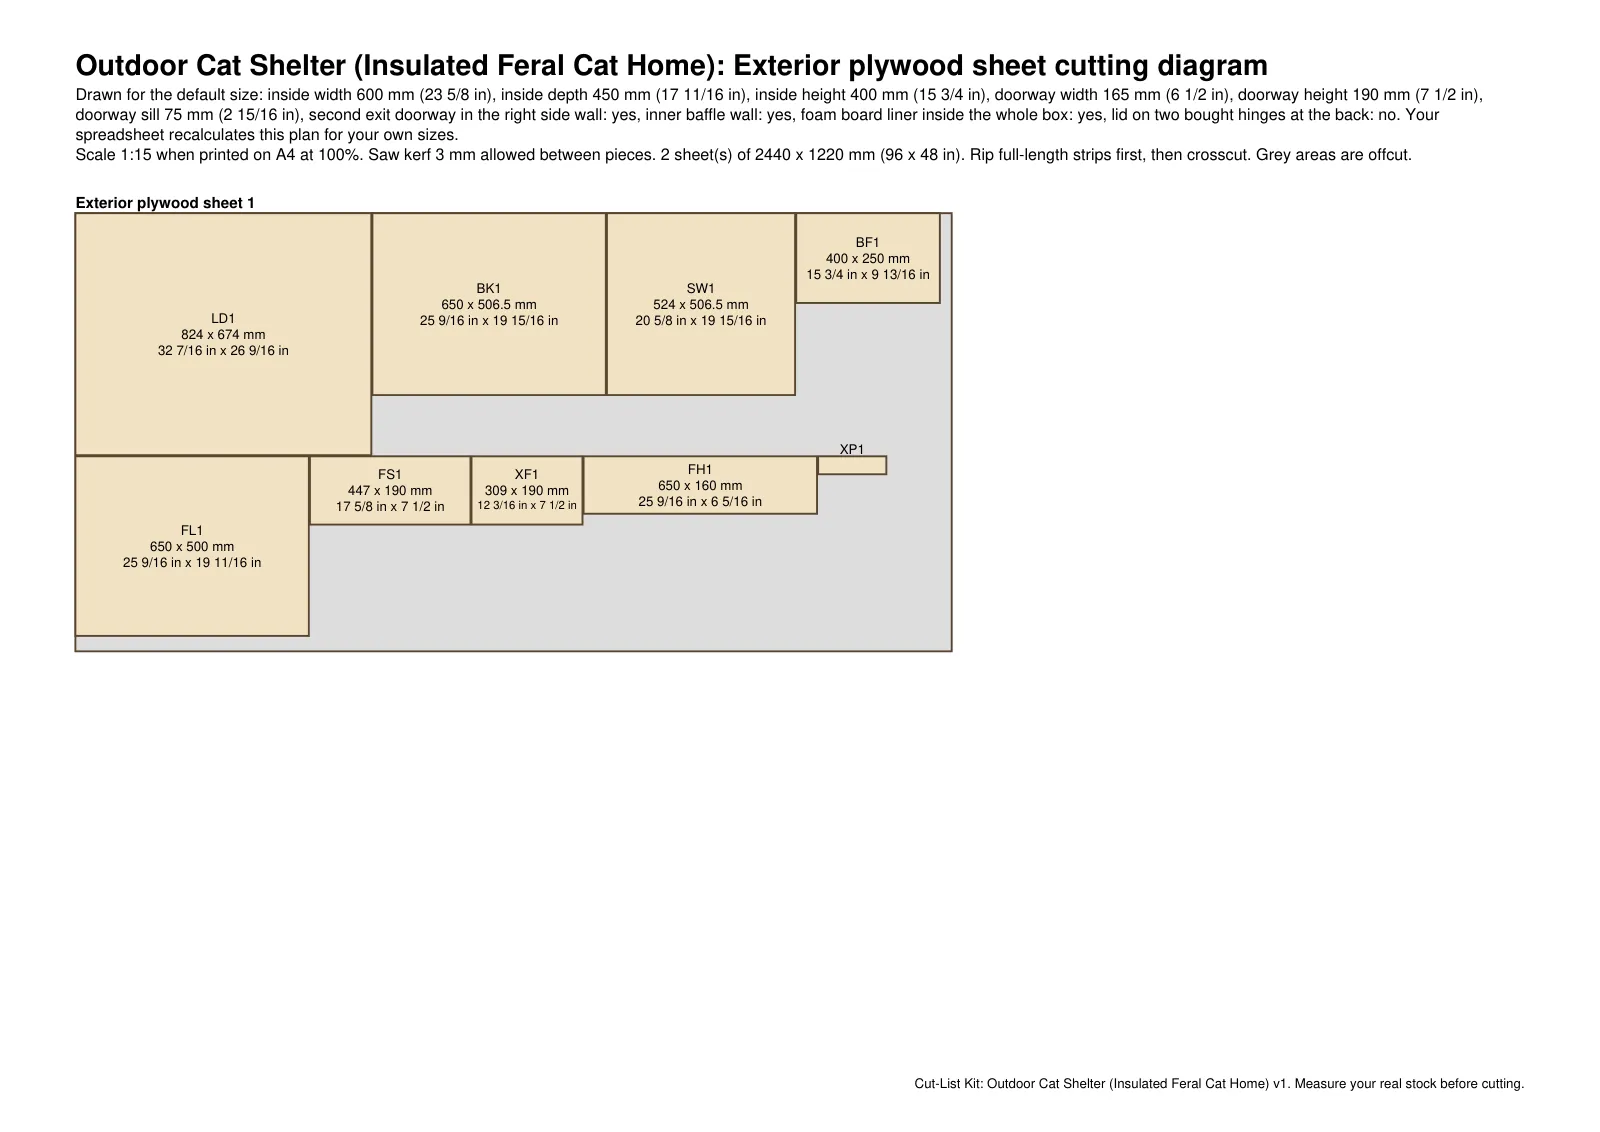
The cutting diagram has five pages and covers all four materials, the foam board included. The plan PDF shows the front and right side walls from outside, with the pieces laid on their cleats and a dot at each screw.
- cut-list-kit.zip
Holds the spreadsheet itself, plus a copy of each PDF and parts.csv, the cut list in a form any spreadsheet can import. Unzip it on a computer. On a phone, a file-manager app can open it.
- cutlist-calculator.xlsx
- plan.pdf
- cutting-diagram.pdf
- parts.csv
- plan.pdf
10 pages. Drawings with every dimension, the hardware list, 9 numbered build steps and the cut list, all at the default size.
- cutting-diagram.pdf
5 pages: which part is cut from which board or sheet, at the default size.
- parts.txt
The default-size cut list as plain text, for reading on a phone.
Sample pages
How it goes together
The plan PDF has 9 written steps. The six pictures show the order: the base, the back wall, the front wall with its doorway and baffle, the side walls, the foam liner, then the lid.
The back wall, the front wall and the exit wall are each put together flat on the bench, outside face up on their cleats, before the box is stood up.
There is no photo-style picture on this page. Everything shown here is a software render or a page from the kit's own files, and we have not built or photographed a shelter from this plan.
The written steps were drafted with AI help. The drawings and the cut list are generated by code from one model of the build.
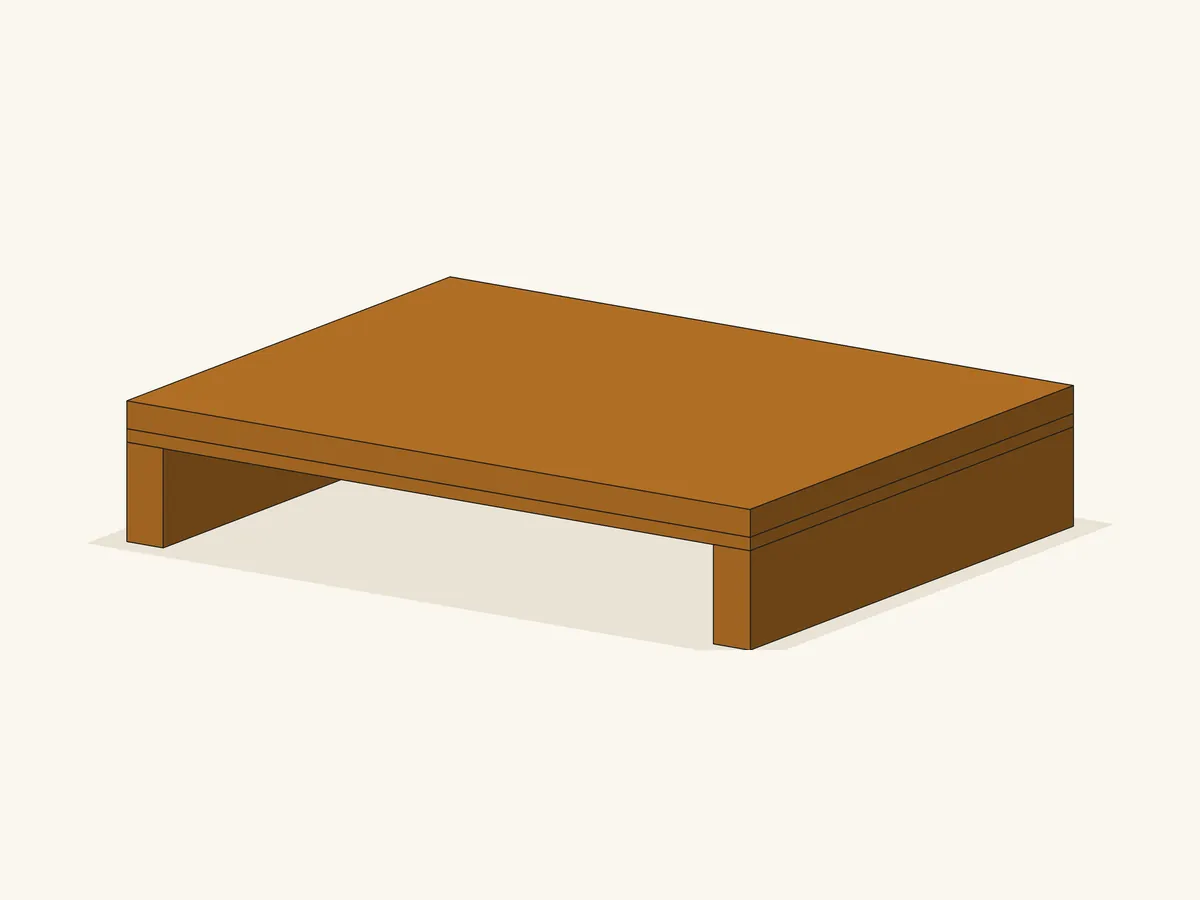
Two 2x4 skids on edge, the floor panel on them and the floor liner (build step 2)
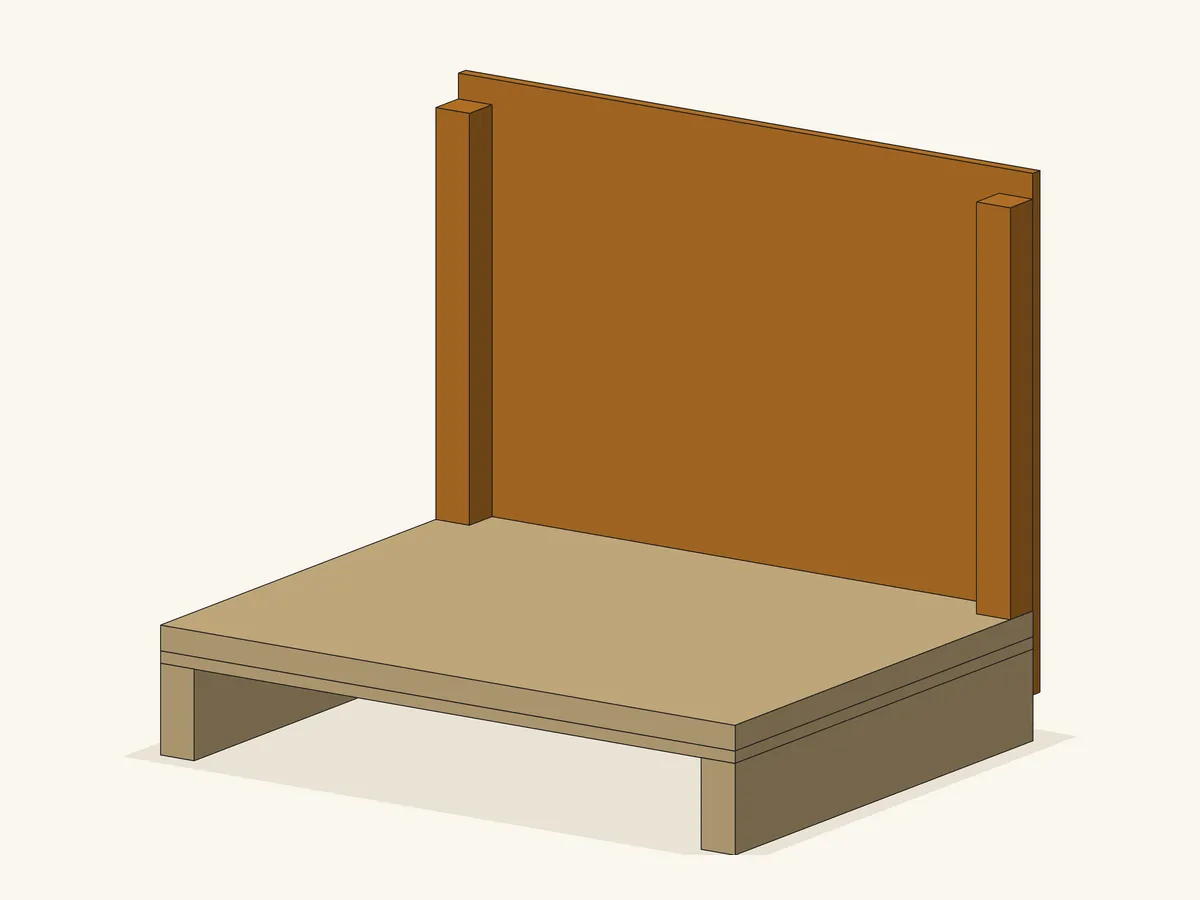
Back wall with its two corner cleats (build step 3)
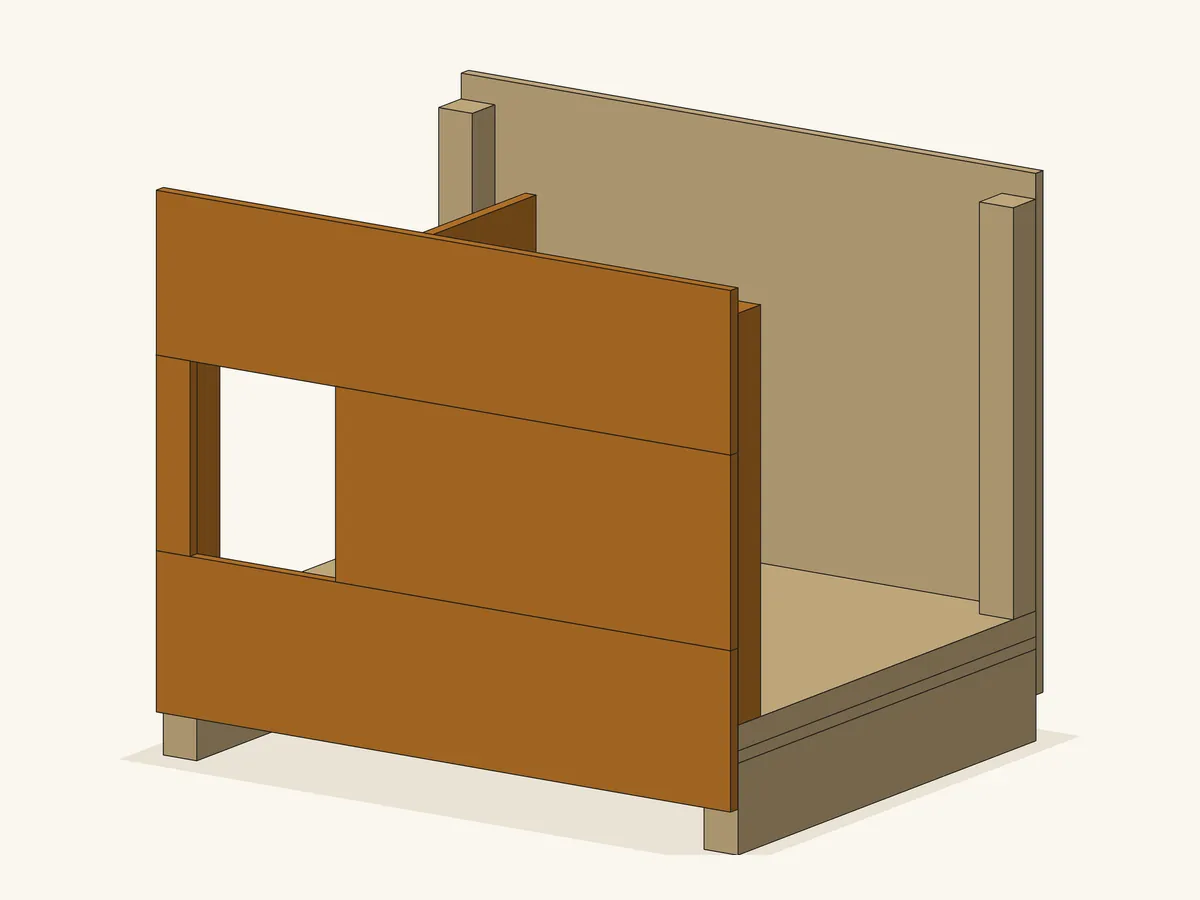
Front wall: four rectangles round the doorway, two corner cleats, the doorway cleat and the baffle (build step 4)
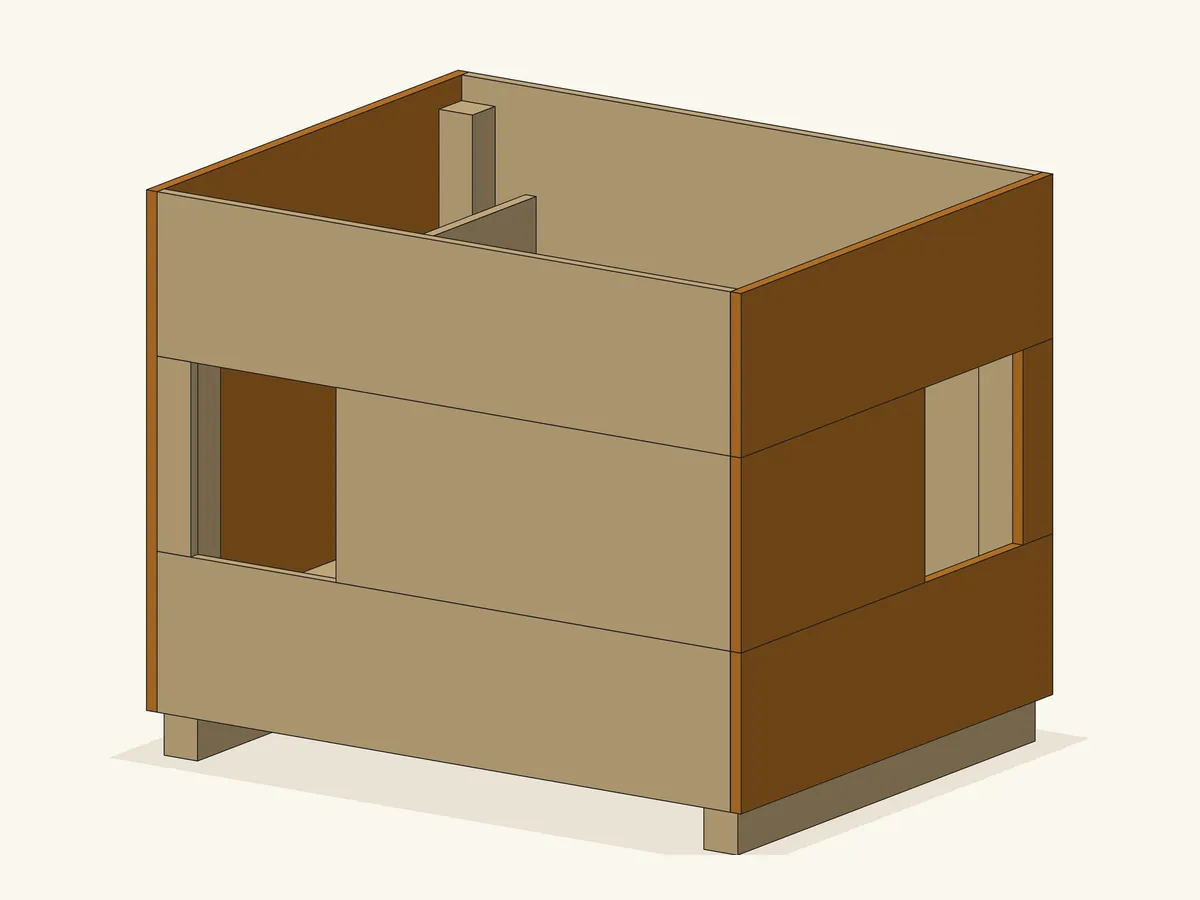
Side walls: the left one a plain panel, the right one four rectangles round the second exit (build steps 5-6)
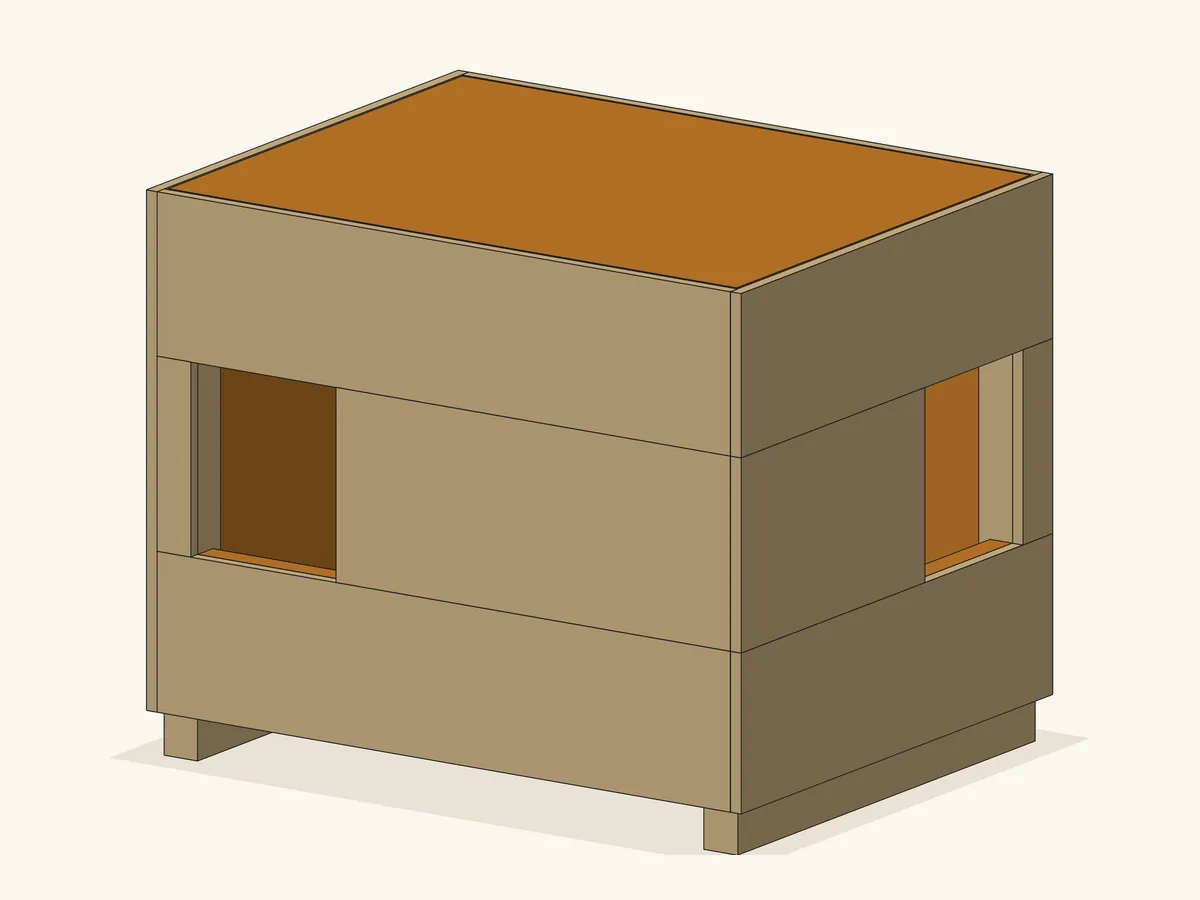
Foam liner: the wall pieces between the cleats, then the loose ceiling piece (build step 7)
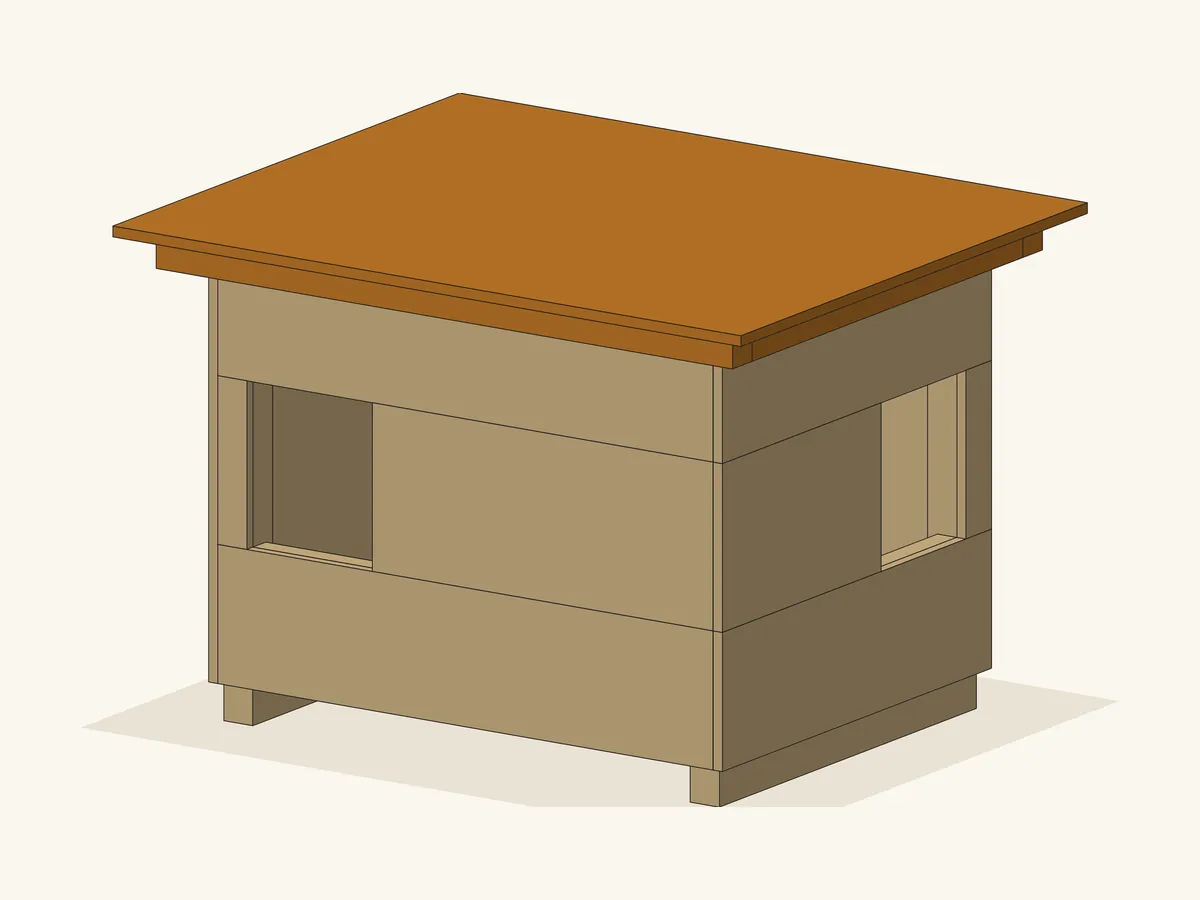
Lid with its four cap strips, overhanging on all four sides (build step 8)
Software renderThe 6 pictures show the main stages at the default size, drawn from the plan's own part sizes. They are not photographs. The plan PDF has all 9 written steps.
What you need
Four materials: exterior plywood, 2x2 boards, 2x4 boards and rigid foam board. The spreadsheet starts with plywood 1/2 in thick and foam board 1 in thick, and you can type other thicknesses.
At the default size the spreadsheet counts two plywood sheets, but the second one carries only four narrow strips. The plan PDF's joint details page shows those strips cut from the first sheet's offcuts instead. Follow that layout and one sheet can do the job.
The foam is cut with a utility knife against a straightedge, and the plan calls for an adhesive whose maker says it is safe on foam board to hold the wall pieces. Two screws, the ones that hold the baffle, need a bit extension or a right-angle driver.
Stock at the default size
- 2exterior plywood sheets
- 32x2 boards
- 12x4 board
- 1rigid foam board
Your own size changes these counts. The spreadsheet gives the new ones.
Counted, not priced
Floor screws, skid screws, corner cleat screws, doorway cleat screws, baffle screws, lid screws, hinge rail screws, hinges, exterior wood glue, foam-safe construction adhesive.
The spreadsheet totals the timber cost from the prices you type. Hardware is counted or measured, not priced: screws, glue, adhesive and hinges not priced.
Tools the plan names
- Circular saw with a straight guide or a table saw for the plywood
- Mitre saw or hand saw for the 2x2 and 2x4
- Sharp utility knife and a straightedge for the foam board
- Drill/driver with a pilot bit
- Countersink bit and a bit extension about 150 mm (6 in) long (or a stubby or right-angle driver for the two baffle screws)
- Caulking gun for the foam adhesive
- Clamps
- Square
- Tape
- Pencil
- Sandpaper
Opening the spreadsheet
The file is cutlist-calculator.xlsx. It has no macros, so nothing needs enabling.
This kit's file was tested in LibreOffice, which is free. We have not tested it in Excel, Google Sheets or Apple Numbers, so we do not promise it works there.
The test record for this file
- 84,536automated checks
- 0failed
- 56sets of inputs: 43 inside the ranges, 13 bad ones that must be refused
- 12 Nov 2026date of the test report
The test compares the spreadsheet with a separate program's results. It covers the arithmetic and the cutting plan, not the design, and it is not a physical build. How we check every kit
What this plan does not do
This is a plan and a calculator, not an engineered product. It gives no figure for warmth, insulation or weather, and it does not say how many cats the shelter suits. The foam liner is a list of pieces to cut, not a promise about temperature. The plan's own wording follows in full. Read it before you buy.
Safety note, as printed in the plan
- This is a plan for an outdoor shelter for cats and other small animals only.
- No person may sit, stand, kneel or climb on any part of it, and it is not a step, a seat, a table or a shelf.
- It makes NO rating of any kind: no warmth, temperature, insulation-value, weather, wind, waterproof, snow-load, weight, load, strength, stability or fire rating, and no fit guarantee; the figures in it are dimensions.
- This plan includes no heating and no electrical parts.
- Outdoors, set it on firm, level ground and weigh it down or fix it against wind in a way you choose and check yourself; this plan gives no wind figure.
- Seal or paint the outside for outdoor use (no finish is included) and let any paint, sealer, glue or adhesive cure fully and air out before an animal uses it.
- Sand or round every edge and corner, the doorway edges above all.
- Check the shelter often, keep every doorway clear of snow and leaves, and change wet bedding; bedding is not part of this plan.
- Cut plywood and foam board outdoors or with dust extraction, and wear eye and ear protection.
- Check every part against the cut list before assembly.
One sentence per line here; the words are the plan's own.
13 things the spreadsheet does not work out
- Any rating of any kind: no warmth, temperature, insulation-value, weather, wind, waterproof, snow-load, weight, load, strength, stability or fire rating. The figures in this plan are dimensions, not ratings, and nothing here says how a cat will fare in it in any weather.
- How many cats it suits, or what size a cat or a colony needs: you choose the inside size; the plan does not turn cats into a size.
- Heating of any kind and anything electrical: this plan includes no heating and no electrical parts.
- Bedding: not part of this plan.
- Anchoring: how you weigh it down or fix it against wind is your choice; no holding figure is given, because it would be a rating.
- Paint, sealer or any finish, and which plywood, lumber and foam board to buy (grade, treatment, foam type): check the makers' own figures, and check that the foam adhesive is safe on your foam board.
- The corner cleats stand inside the clear space: each one stands the corner steps in the Cut List in from the liner faces (from the plywood faces without the liner), the full inside height; the inside size is measured between those faces, past the cleats.
- Ground drainage, levelling, or any base under the skids.
- Wood grain direction, knots, warp or other defects in your stock.
- Trimming factory ends or edges beyond the saw kerf you enter.
- The price of the screws, the glue, the adhesive and the hinges: they are counted, not priced.
- Board-feet: sheets and boards are counted as whole pieces.
- A guaranteed minimum number of sheets or boards: the cutting plan is good, but it is not proven to be the fewest possible; the Calculator and the Cutting Plan sheets show the counts and a lower bound that no plan can beat.
The list is copied from the kit's own files, so it matches what you download.
Questions about this kit
How many cats does it fit?
The plan does not work that out. You type the clear inside size: 18 to 35 in wide, 14 to 24 in deep and 12 to 22 in high. The file starts at 600 x 450 x 400 mm, or 24 x 18 x 16 in when set to inches.
Is it heated or insulated?
It is not heated. The plan has no heating and nothing electrical. It does list a rigid foam board liner for the floor, walls and ceiling, which you can switch off. Either way, the plan gives no insulation or warmth figure.
Do I have to cut a doorway out of a panel?
No. Each doorway is the gap between four separate rectangles, so every cut is a straight cut across or along a piece. The tool list has no jigsaw.
Can I leave out the second exit, the baffle or the liner?
Yes. Each has its own cell: type 0 to leave it out. Without the second exit, the right side wall is one plain panel. Without the liner, the foam pieces leave the cut list and the inside size is measured between the plywood faces.
How much plywood does it take?
At the default size the spreadsheet counts 2 exterior plywood sheets. The second sheet holds only four narrow strips, and the plan PDF shows how to get them from offcuts of the first. The spreadsheet recounts the sheets for any other size.
Which program opens the spreadsheet?
LibreOffice Calc, which is free. It is the program this kit's file was tested in. We have not tested it in Excel, Google Sheets or Apple Numbers.
Outdoor Cat Shelter Cut-List Kit
Digital download: nothing is shipped. Opens our Etsy listing in a new tab. You pay on Etsy and Etsy delivers the files. This site takes no payment.
Price as listed on Etsy on 16 Nov 2026. Etsy may add tax, such as VAT, at checkout. If Etsy shows a different price, the Etsy price applies.
Questions first? Message us on Etsy (opens in a new tab). See refunds and delivery.